Dojo - drag and drop
EPiServer is using Dojo as the client-side rendering framework for the edit mode. Dojo contains dozens of different modules that help you with the rendering of your page. One of those modules is the drag and drop functionality, which can be found in the package dojo/dnd. EPiServer uses the drag and drop functionality of Dojo in a number of different places in the CMS. For example, when you drag a block in a ContentArea property on the page. It’s easy to extend the interface of EPiServer with Dojo. I have come up with a solution for viewing statistics of a page and I will explain this in a series of blog posts. For the solution, I had to extend the interface of EPiServer. In this first blog, I will talk and explain the drag and drop functionality of Dojo which is part of my solution.
The source of this blog can be found on my GitHub account. A live demo can be found onJSFiddle, which will provide a nice playground![]() . For this demo, I’m not using EPiServer, but just a HTML page with the
Dojo Toolkit.
. For this demo, I’m not using EPiServer, but just a HTML page with the
Dojo Toolkit.
Load Dojo
The Dojo Toolkit is available on the CDN of Google, namely ajax.googleapis.com. At the moment of writing the latest version of Dojo is 1.10. Below in the code snippet, the body element which contains my Dojo configuration. The first script element contains the configuration for Dojo. The src attribute points to the CDN of Google for loading the Dojo scripts. The data-dojo-config contains the Dojo configuration. Here I tell the framework to parse the HTML when Dojo scripts are loaded, debug must be true and to load the scripts asynchronously. In the packages section, I configure my own package with a name and location of my scripts.
In the second script element, I’m using the require method for loading three modules. My own module, dojo/parser (needed because I set the parseOnload to true) and dojo/domready (this module will wait until the DOM is loaded).
The first element after the body will load my custom module. The data-dojo-type contains a reference to my custom module.
<body>
            <div class="demoLayout" data-dojo-type="app/draganddrop"></div>

            <script data-dojo-config="parseOnLoad: true, isDebug: true, async: 1,
                packages: [{
                    name: 'app',
                    location: 'http://localhost:9002/app'
                }]" src="https://ajax.googleapis.com/ajax/libs/dojo/1.10.4/dojo/dojo.js"></script>

            <script>
                require([
                    "app/draganddrop",
                    "dojo/parser",
                    "dojo/domReady!"
                ], function(draganddrop, parser, domReady) {
                });
            </script>
        </body>
Create module
When defining a module you should consider a couple of things. Obviously, you should start with the define method. The first parameter accepts an array of modules you would like to use in your own module. Dojo uses the AMD pattern for loading modules asynchronous. The second parameter, a function that accepts parameters for each loaded module. In this method the declare module is called with the name of the module, an array of modules your module should inherit from and of course the functionality for your module.
define(
        ["dojo/_base/declare", "dijit/_Widget"],
        function(declare, Widget) {
            return declare("app.draganddrop",
                [Widget],
                {

                });
});The dojo/dnd package contains all basic functionality for implementing drag and drop. This package includes a number of modules, below a diagram with some of the important modules.
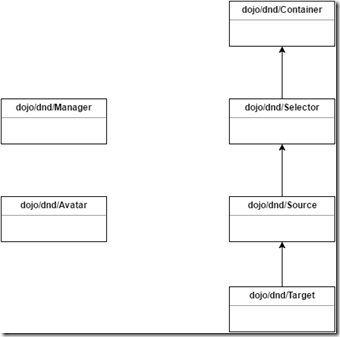
The concept is simple, define a source and target. Items from the source can be drag and drop in the target element. While dragging an element, an avatar will be created to give the user a preview of the drag item. The avatar will be removed when the item is dropped on the target.
Code!
Let me start with the first section of my module. As I explained earlier, if you would like to use other modules (normally this is the case) you can pass them as an array to the define method. For my widget, I’m using some basic Dojo modules for creating DOM nodes and since my widget implement drag and drop functionality I also use the dojo/dnd modules. I’ve named my module ‘app.draganddrop’.
define([
        "dojo",
        "dojo/_base/declare",
        "dojo/dom-construct",
        "dojo/on",
        "dojo/_base/lang",
        "dojo/query",
        "dojo/dom-attr",
        "dojo/number",
        "dojo/dnd/Source",
        "dojo/dnd/Target",
        "dojo/dnd/Manager",

        "dijit/_Widget"
    ], function(
        dojo,
        declare,
        domConstruct,
        on,
        lang,
        query,
        domAttr,
        number,
        Source,
        Target,
        Manager,

        Widget
    ) {
        return declare("app.draganddrop", [
            Widget
        ],
        {
            source: null,
            target: null,
            manager: null,
            eventStatusList: null,
            eventStatusListMouseMoveSourceItem: null,
            eventStatusListMouseMoveTargetItem: null,
The postCreate method will be called when the rendering of the widget is completed. Here, I create some HTML nodes for the markup. I also initialize a Source object. The first parameter is the id of the div element. The second parameter are settings for the Source object. The creator is a method that’s called when an item in the source element should be rendered. The copyOnly setting indicates an item should be copied (not moved) when it’s drag and dropped. Lastly, the generateText is set to false to prevent that the dnd modules don’t automatically generate text in the avatar. After initializing the source object I call the insertNodes method to create items for the source. This method accepts a JSON which contains the items. This method will call the creator method, which I define on the Source object. I will explain the creator method later. Initializing the Target object is fairly the same as the Source object. The Target module inherits from the Source module as you saw earlier in the diagram. The difference in this example is that the Target object doesn’t contain any items and in the settings I’ve defined the accept property. I will discuss this later on.
postCreate: function() {
                this.manager = Manager.manager();
                var sourceContainer = domConstruct.create("div", { class: "listContainer" }, this.domNode);
                var sourceTitle = domConstruct.create("h1", { class: "listTitle", innerHTML: "Source" }, sourceContainer);
                var sourceListNode = domConstruct.create("ul", { id: "draganddropSource", class: "sourceList" }, sourceContainer);

                var targetContainer = domConstruct.create("div", { class: "listContainer" }, this.domNode);
                var targetTitle = domConstruct.create("h1", { class: "listTitle", innerHTML: "Target" }, targetContainer);
                var targetListNode = domConstruct.create("ul", { id: "draganddropTarget", class: "targetList" }, targetContainer);

                this.source = new Source("draganddropSource", { creator: this.sourceItemCreator, copyOnly: true, generateText: false });
                this.source.insertNodes(false, [
                        { id: "sourceItem1", text: "item 1", description: "This is item 1", color: "blue" },
                        { id: "sourceItem2", text: "item 2", description: "This is item 2", color: "orange" },
                        { id: "sourceItem3", text: "item 3", description: "This is item 3", color: "green" },
                        { id: "sourceItem4", text: "item 4", description: "This is item 4", color: "grey" },
                        { id: "sourceItem5", text: "item 5", description: "This is item 5", color: "yellow" },
                        { id: "sourceItem6", text: "item 6", description: "This is item 6", color: "red" },
                    ]);

                this.target = new Source("draganddropTarget", { accept: ["sourceItem"] , creator: this.targetItemCreator });

                this.registerEvents(this.source, "Source", this.eventStatusListMouseMoveSourceItem);
                this.registerEvents(this.target, "Target", this.eventStatusListMouseMoveTargetItem);

                var eventStatusContainer = domConstruct.create("div", { class: "listContainer" }, this.domNode);
                var eventStatusTitle = domConstruct.create("h1", { class: "listTitle", innerHTML: "Events" }, eventStatusContainer);
                this.eventStatusList = domConstruct.create("ul", { class: "eventStatusList" }, eventStatusContainer);
            },
Next are the creator methods for the Source and Target. The sourceItemCreator method is called obviously by the Source when an item should be created. This method is also called when an avatar must be created (so when an item is dragged). This method accepts two parameters, an item which is the JSON item I passed when calling the insertNodes method and the hint parameter. The hint parameter will contain the ‘avatar’ value when the items are dragged from the Source. The method returns the created node for the item, the data of the item and the name of the type. With the type, you can restrict where the item can be dropped. My Target object accepts items of the type ‘sourceItem’.
The second method targetItemCreator works the same as the sourceItemCreator method.
sourceItemCreator: function(item, hint) {
                if(hint == "avatar") {
                    var div = domConstruct.create("div", { class: "source-avatar", style: "background-color:" + item.color, innerHTML: item.text});

                     return { node:div, data: item, type: ["sourceItem"] };
                }
                var li = domConstruct.create("li", { id: item.id, innerHTML: item.text});

                return { node:li, data: item, type: ["sourceItem"] };
            },

            targetItemCreator: function(item, hint) {
                var li = domConstruct.create("li", { id: item.id });
                var div = domConstruct.create("div", { class: "target-item", style: "background-color:" + item.color, innerHTML: item.text + ' - ' + item.description }, li)

                return { node:li, data: item };
},There are a number of events that are fired by Dojo. These events can be used when you would like to alter the drag and drop functionality. An overview of some events:
- DndDrop = Fired when an item is dropped in the Source or Target
- DraggingOver = Fired when an item is dragged over the Source or Target
- DraggingOut = Fired when an item is dragged out of the Source or Target
- DropExternal = Fired when an item is dropped in another Source or Target
- DropInternal = Fired when an item is dropped in the same Source or Target
- DndCancel = Fired when the user cancels the drop operation (pressing Esc)
- OverEvent = Fired when the cursor moves over the Source or Target
- OutEvent = Fired when the cursor moves out of the Source or Target
- MouseMove = Fired each time the cursor moves inside the Source or Target
- MouseDown = Fired when the mouse is clicked in the Source or Target
- MouseUp = Fired when the mouse is clicked in the Source or Target
In the demo, I registered all events and displayed when events are caught.
This is the first part of a series of blog posts about extending the EPiServer interface with Dojo. Second blog coming soon about charts.
The code is available on my GitHub account and a live demo on JSFiddle.
 Twitter
 LinkedIn
 GitHub