Standardize payments with the Payment Request API and Episerver's Service API
During the Partner Close-up event in Stockholm, I gave a presentation together with my colleague Brian Weeteling. We talked about how to develop a modern storefront by using several browser features. You can find the slides of the presentation here. In this blog post, I’ll focus on the new Payment Request API browser feature that was adopted by the World Wide Web Consortium (W3C) in 2018. Currently, this browser feature is supported by several browsers like Edge, Chrome and FireFox plus on their mobile versions. The Payment Request API is a new way of standardizing payments in the browser. This new feature provides the interface and all interactions that the visitor can do within the UI. In this blog post, I’ll explain what you can do with the Payment Request API and how you can integrate with Episerver by using the Service API.
According to a Google research, almost 80% of all orders placed on mobile only contains one single product. When using a mobile device visitors wants to order fast without re-entering their same contact and payment information again and again. In our industry, repetitive work is recognized quickly and solutions are developed and released fast. So did Google, they saw an opportunity to standardize payments online and developed the Payment Request API. This browser feature allows visitors to store information like contact, payment and shipment information inside their browser’s user account. By doing this they don’t have to re-enter their same information between different web shops. This means it’s optimal for doing fast-ordering, it just takes a few clicks before an order is placed. It’s a bit similar how Amazon it's doing with their one-click ordering button. The difference with the Payment Request API is that it’s a browser feature so it’s not limited to only one webshop. Another big plus is that it provides a very consistent experience for the visitor because the UI and user flow are always the same between different web shops. And it's not limited to only the desktop because data is synced to the visitor mobile device as well. Bear in mind that the Payment Request API only provides the UI and user actions the actual integration with a merchant is not supported out of the box. However, multiple merchants already created an integration. Some examples are Apple, Google, Android and Samsung Pay, Stripe and many more. Let’s take a look at what needs to be done in order to use the Payment Request API.
How to use the PaymentRequest class
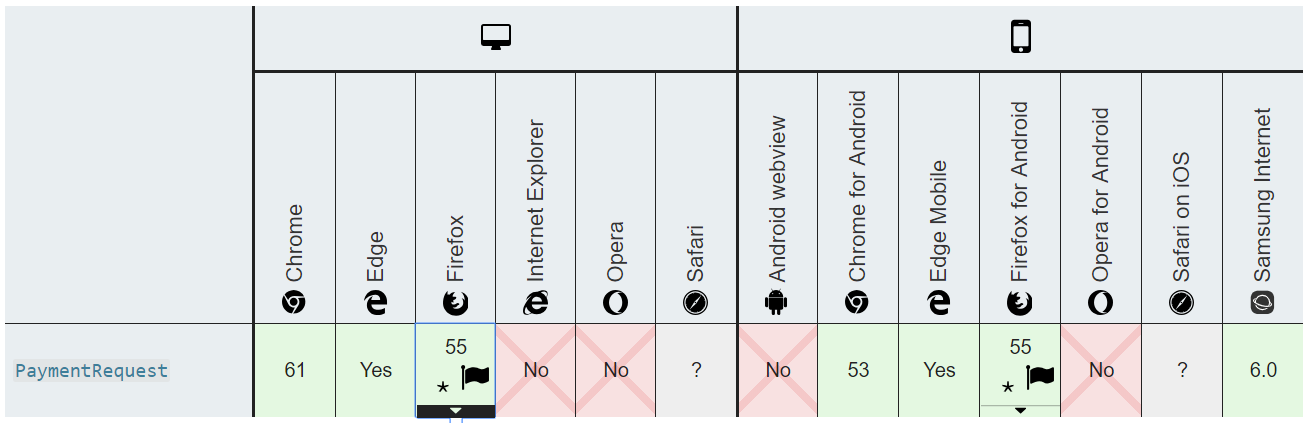
The W3C adopted the Payment Request API as a browser feature in 2018 and it’s currently supported by several
browsers as you can see in the image. The PaymentRequest class can be created by
passing three parameters,
PaymentMethodData[], PaymentDetailsInit and PaymentOptions. The first parameter is an array of payment methods
that are displayed to the customer. In the below, code sample you can see that I configured basic cards and
Google Pay. Google Pay is a URL-based payment method identifier.
                const paymentMethods: PaymentMethodData[] = [
                {
                    supportedMethods: ["basic-card"],
                    data: {
                        supportedNetworks: [
                        "visa",
                        "mastercard",
                        "amex",
                        "discover",
                        "diners",
                        "jcb",
                        "unionpay"
                        ]
                    }
                },
                googlePay
            ];
The second parameter is the PaymentDetailsInit class which allows you to render
display items. Of course, the
total is required, but it’s possible to render some additional display items like the discounts, shipping total,
tax total, etc.
                    const paymentDetails = {
                        displayItems: [
                          {
                            label: "Subtotal",
                            amount: {
                              currency: "USD",
                              value: "11,60"
                            }
                          },
                          {
                            label: "Shipping costs",
                            amount: {
                              currency: "USD",
                              value: "20"
                            }
                          }
                        ],
                        total: {
                          label: "Total",
                          amount: { currency: "USD", value: "31,60" }
                        }
                      };
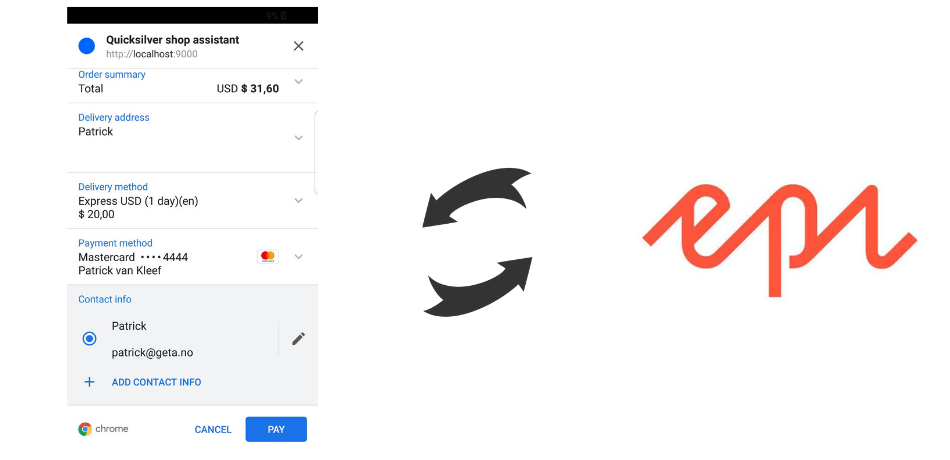
The last parameter is the PaymentOptions class. This class allows you to ask the
visitor for some additional
information like their name, email and phone number. When these properties are set to true the UI will render
the Contact info section.
                            const paymentOptions = {
                                requestShipping: true,
                                requestPayerEmail: true,
                                requestPayerPhone: true,
                                requestPayerName: true,
                                shippingType: "shipping"
                              };
Now it’s time to pass the three parameters to the PaymentRequest class and render
the UI. With the
canMakePayment method we can check if the visitor can actually make a payment with
one of the displayed payment
methods. This is being done by checking if the visitor configured one of the methods inside the browser. If this
method returns false, it's likely that you fall back to the default checkout process. In order to show the
Payment Request UI, we need to call the show method. The show method returns a promise which can be used to
complete the payment and create the order. In the next section, I’ll explain how Episerver’s Service API can be
used to get configured shipment methods and show them in the Payment Request API. Also how an order can be
created.
                          const paymentRequest = new PaymentRequest(
                            paymentMethods,
                            paymentDetails,
                            paymentOptions
                          );

                          const canMakePayment = paymentRequest.canMakePayment();
                          if (!canMakePayment) {
                            alert("No supported payment methods, customer can't do payment");
                          }

                          paymentRequest.addEventListener(
                            "shippingaddresschange",
                            this.shippingAddressChange
                          );
                          paymentRequest.addEventListener(
                            "shippingoptionchange",
                            this.shippingOptionChange
                          );

                          paymentRequest
                            .show()
                            .then((response: PaymentResponse) => {
                              response.complete("success");
                              this.createPurchaseOrder();
                            })
                            .catch(err => console.error("Payment Request API error: ", err));
                        };
Integrate Episerver with the Payment Request API by using the Service API
Episerver Service API is mainly used (based on my experience) for integrations with third-party systems like a PIM. It’s very easy to use one of the bulk operations to import categories and products into Episerver. There are also some restful operations like creating an order or to get a shipment method. I’ll use these two operations to integrate with the Payment Request API. Let’s start with installing and configuring the Service API.
The installation is quite straightforward and works the same way as other Episerver modules. The Service API can
be installed by installing the Nuget packages EPiServer.ServiceApi and EPiServer.ServiceApi.Commerce. These
packages are available on the Nuget feed from Episerver. After the packages are installed it’s time to create a
user in the admin mode. Use the ‘Permissions for Functions’ section to give the user permissions to use the
Service API. Now we can use the Service API. Before we do any request we first need to get ourselves an access
token. This can be done with the following request:
            POST http://localhost:9090/episerverapi/token HTTP/1.1
            Content-Type: application/json;charset=UTF-8
            Host: http://localhost:9090
            Content-Length: 60
            Expect: 100-continue
            Connection: Keep-Alive

            grant_type=password&username=admin&password=secret
              {
                "access_token": "Q_tUi_UdZS_pQkBPKyEnKoVx-E0zgQmYvr4fjwuQEHMGUGsZEEGzCXBNAAj2QOj-PwL2LCzX73yPFDobcSTyebx48xs9Haek0PblnTVxOelZQr7HCJ2Jb9n9wMlRCspNo88acGD7e8Iz77awZl5l9qNx0847vmOXAJgbYWUWE8jjfUyPZUPPfKmT7DeoSK76xdCvTK0HJ6-9TKrpuFhWuFZ2AQFret63kNNDgKucTM2vNYP3KD0mVx1DyEnk7wwINY2-4cEvd-uFV0Ie03WreJagPoS8ke9XPCANytRN-IG9FGrnI6Yo6sGHPxvHIJKzDtUgsBxcnZ5MdCoY2US5Lo2fJLm9U2NADWX13vchfXwV0dug3w3Cf-C_BR_xeEZ1-F50EJ-aPyVzOtacz7dILXm_kx6WGh55K_T9jqjk-nyqufFQO5BRbSExjgE6nts1mMv_jXK9NYDqTkF9U0mRCqH-_PQ4Y42-XOkeilP4Gk1Lrge14-zUegGZoHdzAEFpFMWUdxTOYGfj5APHb8juiQ",
                "token_type": "bearer",
                "expires_in": 1199
              }
Listen to Payment Request events to load and display the shipping options
The Payment Request API fires multiple events which can be used. Below an example of two of these events and why you would like to listen to these events.
- Onshippingaddresschange => get shipping options when a visitor enters their address.
- Onshippingoptionchange => update totals when shipping options was selected.
In order to get the configured shipping methods with the Service API this endpoint can be used
/commerce/shipment/shipping-options. Below an example of the request and response.
              GET http://localhost:9090/episerverapi/commerce/shipment/shipping-options HTTP/1.1
              Host: localhost:9090
              Authorization: bearer ydCRaxlnz2o16ZquSLwZX2t8AAKGWVb9kO35uNaLFAHEXpHTnKMCdsDbeXUFbFh2I_2rLUtqYQ9SCSnRFDiZfihcfMt88gymPqpflAhECVYZRgxQi2FQqXsRfLIHNf-LUGBxgNKhzch4EOk-Whm2HckgOLzPOMYYkrb_D_-obAvfYoIMinygLdzHzzCYS5s7ZtO0dEY88KQyjTjraZtp3toJFcnsK8l_kh7_bUSrN0gMvXqz3zp-x_MwodwVAXRwNkD761XCEhk_p4JaFilOWkIPzzp0x3FZo8RdnRokkyQwaTziJLCdnWqfwmMN7Ur2qTfWiHASZJn38oBAj2MSx2ju9jclUMEi4QoQuM4PxBXbtW0GlUMFgpFsDWjHB9q-Zyp4hqoZkA_Zom5pDtgHwEos4rJDBeLOX3qL-_TA8hfvxAiV0dJk7tpqG1D5ED_Cz4Hqx0jEaWLDE-fH1pNmC6FLTPHx8hQ2RuCxBaiQ0DoU0lnB30vAD5oMyr46qlccYQSZPXgKRYznJza_0CHgwQ-3p0FWr_jJGfb5JBu-j4aJA5j9iVSiGxX9k4KTMajMXsRK5qPWLxenJK5m1mBW3Q
              User-Agent: Mozilla/5.0 (Windows NT 10.0; Win64; x64) AppleWebKit/537.36 (KHTML, like Gecko) Chrome/73.0.3683.86 Safari/537.36
              Content-Type: application/json
                [
                {
                  "id": "5a621eec-3dda-49f9-a75c-1017363ea1ed",
                  "displayName": "Click and Collect",
                  "price": {
                    "amount": 0,
                    "currency": "USD"
                  }
                },
                {
                  "id": "d6b808be-81e1-4abe-a02d-b5965433810a",
                  "displayName": "Express USD (1 day)(en)",
                  "price": {
                    "amount": 20,
                    "currency": "USD"
                  }
                },
                {
                  "id": "96b22cc9-9052-4222-90fd-3f3f19f52740",
                  "displayName": "Fast USD (2-3 days)(en)",
                  "price": {
                    "amount": 15,
                    "currency": "USD"
                  }
                },
                {
                  "id": "38acb851-b100-4194-8785-18c39253fde9",
                  "displayName": "Regular USD (4-7 days)(en)",
                  "price": {
                    "amount": 5,
                    "currency": "USD"
                  }
                }
              ]
Now that we retrieved the shipping options from Episerver it’s time to configure them in the Payment Request API. So when the visitor enters the shipping address the event listener is fired and the endpoint for getting the shipping options are called.
          paymentRequest.addEventListener(
            "shippingaddresschange",
            this.shippingAddressChange
          );

          shippingAddressChange = (event: any) => {
            const shippingOptionsPromise = this.repository
              .getShippingOptions()
              .then((data: PaymentShippingOption[]) => {
                this.shippingOptions = data;
                return {
                  ...this.getPaymentMethodDetails(),
                  shippingOptions: data
                };
              });

            event.updateWith(shippingOptionsPromise);
          };
Create order in Episerver by using the Service API
After the visitor enters all of their information in the Payment Request API and the payment is finalized it’s
time to create the order in Episerver. As I said, the show method returns a promise
which is executed when the
visitors completes the payment in the UI. The endpoint /commerce/orders can be used
to create an order inside
Episerver. The body of the request should include a JSON with all necessary data to create the order like the
line items, selected shipping and payment options, and much more. Below a code example, to use the promise that
is returned by the show method.
            paymentRequest
            .show()
            .then((response: PaymentResponse) => {
              response.complete("success");
              this.createPurchaseOrder();
            })
            .catch(err => console.error("Payment Request API error: ", err));
Below an example of the request and response of the create order call:
                POST http://localhost:9090/episerverapi/commerce/orders HTTP/1.1
                Host: localhost:9090
                Content-Length: 1172
                Authorization: bearer m8np7ZOjo4D8ZIKh6AJ0NFtYnBI5dBJd15p3zCkAzEpm0_y4hAMS-E8qOqUY7xaZJrgYrQFCe-NWSEW4QyKFDUDtSueRH3RjqY7uADf5HMtWbnrfsdcjVuamNEc0RJ5jZxYHjVvNY4K37yhLpswfxv6bNFg-7cUhYgMIQRhbEXDWTlsBlZtCfFMpxZ3cn0jNOxT8DSZv-ltGb3C8ycWRbLoVPXocQYzwKAxSJTxvTnAq2udXrmtOTy5V29mRUc8Jw1roSDZkaHIOT43-iO7oQuVzuONiskGduQu2A5o9ng2VGJ1VE0-Jnhs9o62jAPQcp1RDpIvxVj6XTaAfvKdGyjOEU1HmCkFfNLw0f-DMyDSM26cA5joKxY70xhivzVEAhR3mNzoFvuffzOyYt6_4rb1--OnYS-Z61pPGxYU-wVjdhGLIRQIxJg6ykQrUKjwnai0GFa0hCeC8EVKGBJjqjJnfeTrV5mIRQ9fPH3RpBsIIqmVXWWUCDXc2dxYvsedENuGGYzygLckS4XAcp1ffnHFr3qerSpnLC9TSKZUEkxXWY5ln7c65C1Pt-4jl241BDZqfjlKp8fjQvVTqriAWew
                User-Agent: Mozilla/5.0 (Windows NT 10.0; Win64; x64) AppleWebKit/537.36 (KHTML, like Gecko) Chrome/73.0.3683.86 Safari/537.36
                Content-Type: application/json

                {
                  "orderNumber": "POApp1554572072217",
                  "billingCurrency": "USD",
                  "customerId": "17c95479-d217-4bd4-b4c0-f95b497d13b7",
                  "customerName": "Patrick van Kleef",
                  "marketId": "US",
                  "name": "StoreApp",
                  "orderAddresses": [
                    {
                      "name": "DefaultAddress",
                      "firstName": "Patrick",
                      "lastName": "van Kleef",
                      "line1": "Street A",
                      "city": "New York",
                      "countryName": "US",
                      "postalCode": "12345",
                      "regionCode": "NY",
                      "daytimePhoneNumber": "+18662891597",
                      "email": "[email protected]"
                    }
                  ],
                  "orderForms": [
                    {
                      "shipments": [
                        {
                          "shippingMethodId": "96b22cc9-9052-4222-90fd-3f3f19f52740",
                          "shippingAddressId": "DefaultAddress",
                          "warehouseCode": "stockholmstore",
                          "lineItems": [
                            {
                              "code": "P-36127195",
                              "displayName": "Faded Glory Mens Canvas Twin Gore Slip-On Shoe",
                              "placedPrice": 14.5,
                              "quantity": 1
                            }
                          ]
                        }
                      ],
                      "payments": [
                        {
                          "amount": 14.5,
                          "billingAddressId": "DefaultAddress",
                          "customerName": "Patrick van Kleef",
                          "paymentMethodId": "4a671211-9441-432c-aab0-bde96a51da9a",
                          "paymentMethodName": "GenericCreditCard",
                          "status": "Pending",
                          "implementationClass": "Mediachase.Commerce.Orders.CreditCardPayment,Mediachase.Commerce",
                          "transactionType": "Authorization"
                        }
                      ],
                      "name": "Patrick van Kleef",
                      "billingAddressId": "DefaultAddress",
                      "properties": [

                      ]
                    }
                  ],
                  "status": "InProgress"
                }
Summarize
The Payment Request API is a new way to standardize payments inside the browser. It provides a very convenient experience for customers because they don’t need to re-enter their same information between web shops and the UI is always the same. It’s optimal for doing fast ordering which is something that is desirable for doing payments on a mobile device. In order to integrate the Payment Request API with Episerver, we can use the Service API. This API provides bulk operation for doing integrations, but also restful operations like getting the configured shipping options and creating an order.
 Twitter
 LinkedIn
 GitHub