EPiServer content migration
Currently I’m working on a EPiServer project where I need to migrate content from an old site to a new site I’m building. Both are EPiServer sites, the old site is built with version 7 and the new site is currently build with the latest version of EPiServer, 8. The problem with the content migration is that the content types from the old site doesn’t match with the content types of the new site. Anders G. Norby wrote a blog how you can solve this issue with standard functionality of EPiServer. Unfortunately this solution wouldn’t work for my issue because in the old site some content was configured on blocks and on the new site content is setup on page types. I will start explaining the standard export/import functionality of EPiServer. Then I will share my solution with you guys, hopefully you can use it for your own projects.
Export functionality in EPiServer
To migrate content from staging to a production environment the standard export/import functionality of EPiServer can be used. To export content browse to the admin mode and click on ‘Export Data’ in the ‘Tools’ menu. In this screen various options can be selected for the content migration.
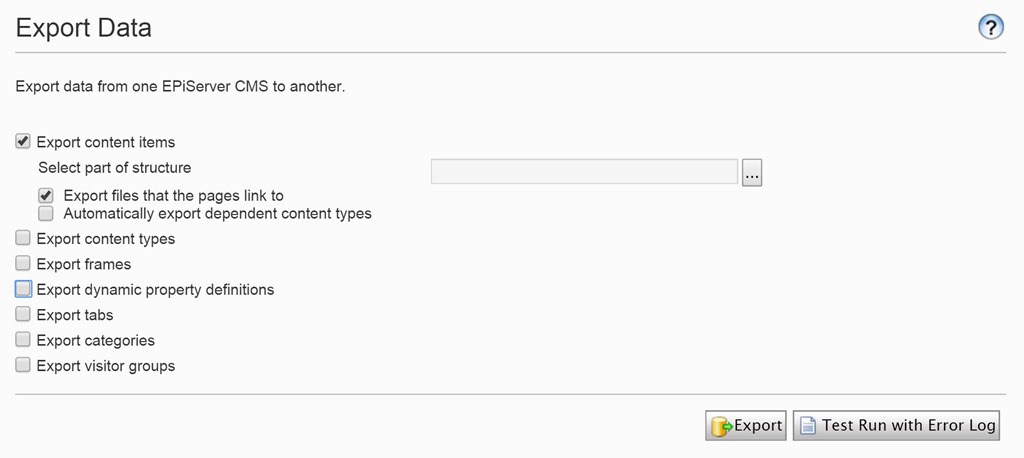
- Content items
- Content types
- Frames
- Dynamic property definitions
- Tabs
- Categories
- Visitor groups
It’s also possible to do a test run of the export and view the log results or just export the data by pressing the ‘Export’ button. The file that’s exported is called ExportedFile.episerverdata. As you can see EPiServer uses an own file extension. This file is a compressed file containing the exported data. The exported data contains XML’s and files (images, documents). EPiServer uses the System.IO.Packaging.ZipPackage class of the .NET framework. With this class it’s possible to a create a compressed file. A ZipPackage class can contain one or more System.IO.Packaging.ZipPackagePart that represent a file that needs to be compressed into a single file.
Events
While exporting data it’s possible to hook into the events, ContentExporting, ContentExported, ExportPropertyEvent, Exporting, FileExporting, FileExported. With these events it’s possible to prevent content from being exported for example.
Import functionality in EPiServer
The exported file (ExportedFile.episerverdata) can be imported in a different EPiServer environment. To import data browse to the admin mode and click on ‘Import Data’ in the ‘Tools’ menu. In the opened screen you can select a file, this should be a file with an .episerverdata extension. Also a page destination needs to be selected, this is a page in the content tree. Underneath this page the content will be imported. It’s possible to upload and verify if the file is valid or just hit the ‘Begin Import’ button.
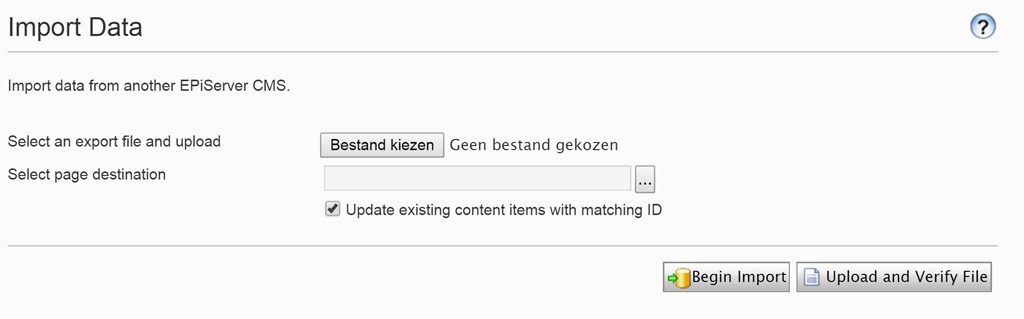
After the import button is clicked EPiServer uploads the file and again uses the System.IO.Packaging.ZipPackage class to uncompress the file.
Events
While importing data it’s possible to hook into the events, ContentImporting, ContentImported, FileImporting, FileImported, Importing, Imported, ImportingPages. I’m using the ContentImporting event in my content migration solution, later in the blog more about it.
Problem
As I explained in the introduction of this blog the problem that occurred was that the content in the old site was configured in blocks on the page. On the new site some content was setup on the page type. So I knew I had to write code to convert the old pages to new pages with a different page type. But I wanted to reduce the amount of code as much as possible. Below a sequence diagram of the content migration process, after that I’ll explain the steps individually.
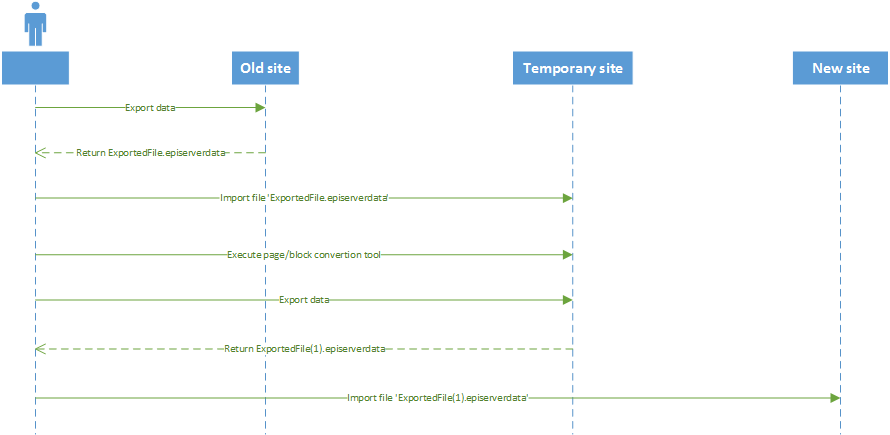
The first step was easy, export the data from the old site with the standard functionality of EPiServer as I explained earlier. Nothing custom here just export the data.
2. Import data into a empty temporary EPiServer site
For this import I created a new temporary EPiServer site in my Visual Studio solution. First let me explain how the Visual Studio solution is setup, below a visual.
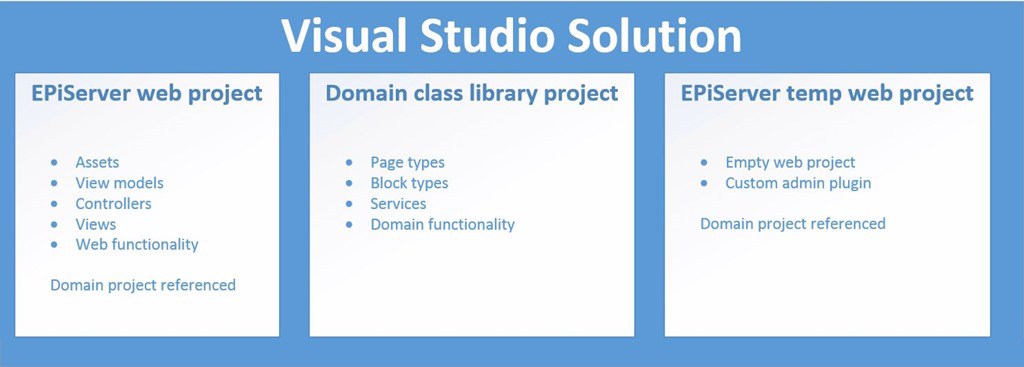
The solution contains a EPiServer web project for the new site, a domain project and a EPiServer temporary web project. The reason I created the temporary EPiServer project in the same solution is because I wanted to use the newly created page and block types for the custom convertion code of the old page types. I did this by add a reference to the domain project.
In the temporary site I created two container pages under the root of page tree. First one is ‘[Import]’ and the second one is ‘[Export]’. In this step I imported the file I created earlier in the first step. I configured the ‘[Import]’ container page as the destination root page for the import.
3. Convert old pages to new pages
For this step I created custom code that converts the old pages to the new pages with new page types. In the temporary web project I created a custom admin plugin. The admin plugin only contains a button and a label for the results. So when the button is clicked I execute a method that performs the convertion. Below a simple example how an imported page from the old site is converted to a new page. This is just a simple example I wrote a lot more code to convert an old page with blocks to a new page type.
private void Convert(int parentImportedPageId, int targetParentNewPageId)
            {
                var childPages = _contentRepository.GetChildren<PageData>(new ContentReference(parentImportedPageId));

                foreach (var item in childPages)
                {
                    var newPage = _contentRepository.GetDefault<NewContentPage>(new ContentReference(targetParentNewPageId));

                    newPage.PageName = GetPropertyValue<string>(item.Property["Heading"]);
                    newPage.Content = GetPropertyValue<string>(item.Property["Content"]);

                    _contentRepository.Save(newPage, SaveAction.Publish);
                }
            }
When the custom page convert code is executed then new pages are created with the new site page types under the ‘[Export]’ container page.
4. Export data from the temporary site
In this step the created pages from the custom page convert code is exported with the standard export functionality of EPiServer. In the export settings I selected the ‘[Export]’ container page as the root of the pages that should be exported.
5. Import data into the new EPiServer site
So far so good. The final step is import the data in the new EPiServer site, again I can do this with the standard import functionality of EPiServer. Everything seems to go great, first I exported the pages from the old site to the temporary site, I converted the old pages to the new page types and the last step is to do a simple import in the new site. But a new problem occurred while importing the data. When I exported the pages I had to select a root page, so I selected the ‘[Export]’ container page, because underneath the container page all the converted pages where created. The problem is that when importing the data also the selected root, in my case ‘[Export]’, page is imported. That is not what I want, because in my new EPiServer site I already have an overview (root) page.
This behavior can be prevented by hooking into the import events, as I explained earlier in this blog. Below the code I’ve used to prevent the root container page to be imported. First I get the page type instance of the ‘[Export]’ container page. Then I check if the current importing content, that’s passed to this method, matches with the container page type. If that’s true I set the Cancel property to true indicating that this content shouldn’t be imported.
DataImporter.ContentImporting += DataImporter_ContentImporting;public void DataImporter_ContentImporting(object sender, ContentImportingEventArgs e)
{
var contentTypeRepository = ServiceLocator.Current.GetInstance<IContentTypeRepository>();
var dataContainerPageType = contentTypeRepository.Load(typeof(DataContainerPage));
var pageTypeId = e.TransferContentData.RawContentData.Property.FirstOrDefault(p => p.Name.Equals("PageTypeName", StringComparison.InvariantCultureIgnoreCase));
if (pageTypeId != null && pageTypeId.Value.Equals(dataContainerPageType.Name))
{
e.Cancel = true;
}
}So after this last step my content migration was finished!
 Twitter
 LinkedIn
 GitHub