Exploring the City of Amsterdam with Azure Durable Functions and the Custom Vision Service

Nowadays, people tend to search for things that are nearby. Search phrases include the words “near me”. This basically means, that people, for example, search for restaurants that are close to their current location. According to Google on-demand searches are actually one of the most common searches. Google published an interesting article about local mobile searches last year, which you can find here. This article describes a new trend in how people tend to find places or things to do which are nearby them. Obviously, it’s important to know their current localization but preferable also their interests. Based on this information the most relevant results can be returned.
This article has inspired me to build a prototype application. The solution is split up into two applications, a tourist and admin application. In the tourist application, users can take a photo and upload it, the solution will recognize what has been photographed and the user can start a wizard to find other interesting things to do in the city. The admin part is creating and training the model that is used for recognizing what tourists have been photographed. For this demo application, I used the new Azure Durable Functions feature to build orchestration functions. Durable Functions was released last year. The reason I’m using Durable Functions is to develop workflows in code. Basically, I want to trigger a new function depending on the output of another function. Microsoft is doing a great job with their Cognitive Services toolset. Applying Artificial Intelligence in your application is becoming ridiculous easy. I've combined multiple services, the Custom Vision Service for recognizing images, the Entity Search Service for getting the most relevant entity information and as the name reveals the Bing Image Search Service for finding images on the web. To find any other interesting things that a tourist can do I’m using the Amsterdam City Data platform which I’ll cover in the next section.
Amsterdam City Data platform
In my previous blog post, I explained that two years ago the City of Amsterdam started an initiative to place approximately 200 beacons all over the city. The goal was to let entrepreneurs use these beacons for developing new solutions that would become beneficial for the city. Another initiative is the City Data platform which exists much longer and provides public access to all kind of data like infrastructural, tourists, public areas, population etc. This should help researches, partners of the city, but also entrepreneurs or companies that want to use this data to build smart applications. Data is exposed by APIs and services, but also downloadable in common formats like JSON or CSV. It depends a bit on the type of data, but it’s being maintained and updated weekly, monthly, yearly or even on request. Below two solutions that consume data of the platform.
GoOv - app for people with disabilities, cognitive disorder, or seniors

This app helps people that can’t travel individually on their own. It provides door to door information for public transportation but also provides walking routes. The app will notify when you should leave the transport at the next stop and in case of any delays. Lastly, the app contains a help button (emergency call) that people can click when they don't know which direction they should go to reach their destination.
Energy Atlas - overview of energy consumption per neighborhood
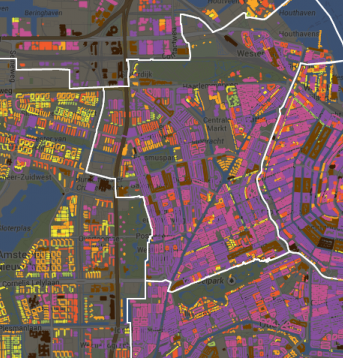
This application provides insights into how much energy is being used in specific neighborhoods. The application map contains detailed information about the energy consumption but also useful insights if you are interested in using sustainable energy like wind or solar or even a combination.
The visual and interactive map contains filter capabilities and presents the results in a detailed map.
City Highlights
As I explained in the intro, I developed a solution that uses different technologies, services and consumes data from the Amsterdam Open Data platform. The solution is split up into two parts, the visitor, and the admin application. The visitor part is the assistant for tourists to explore the city. The admin part trains the machine learning model that is being consulted by the tourist application. Let me start by going into detail about the visitor part.
Application for tourists to assist them in exploring the city
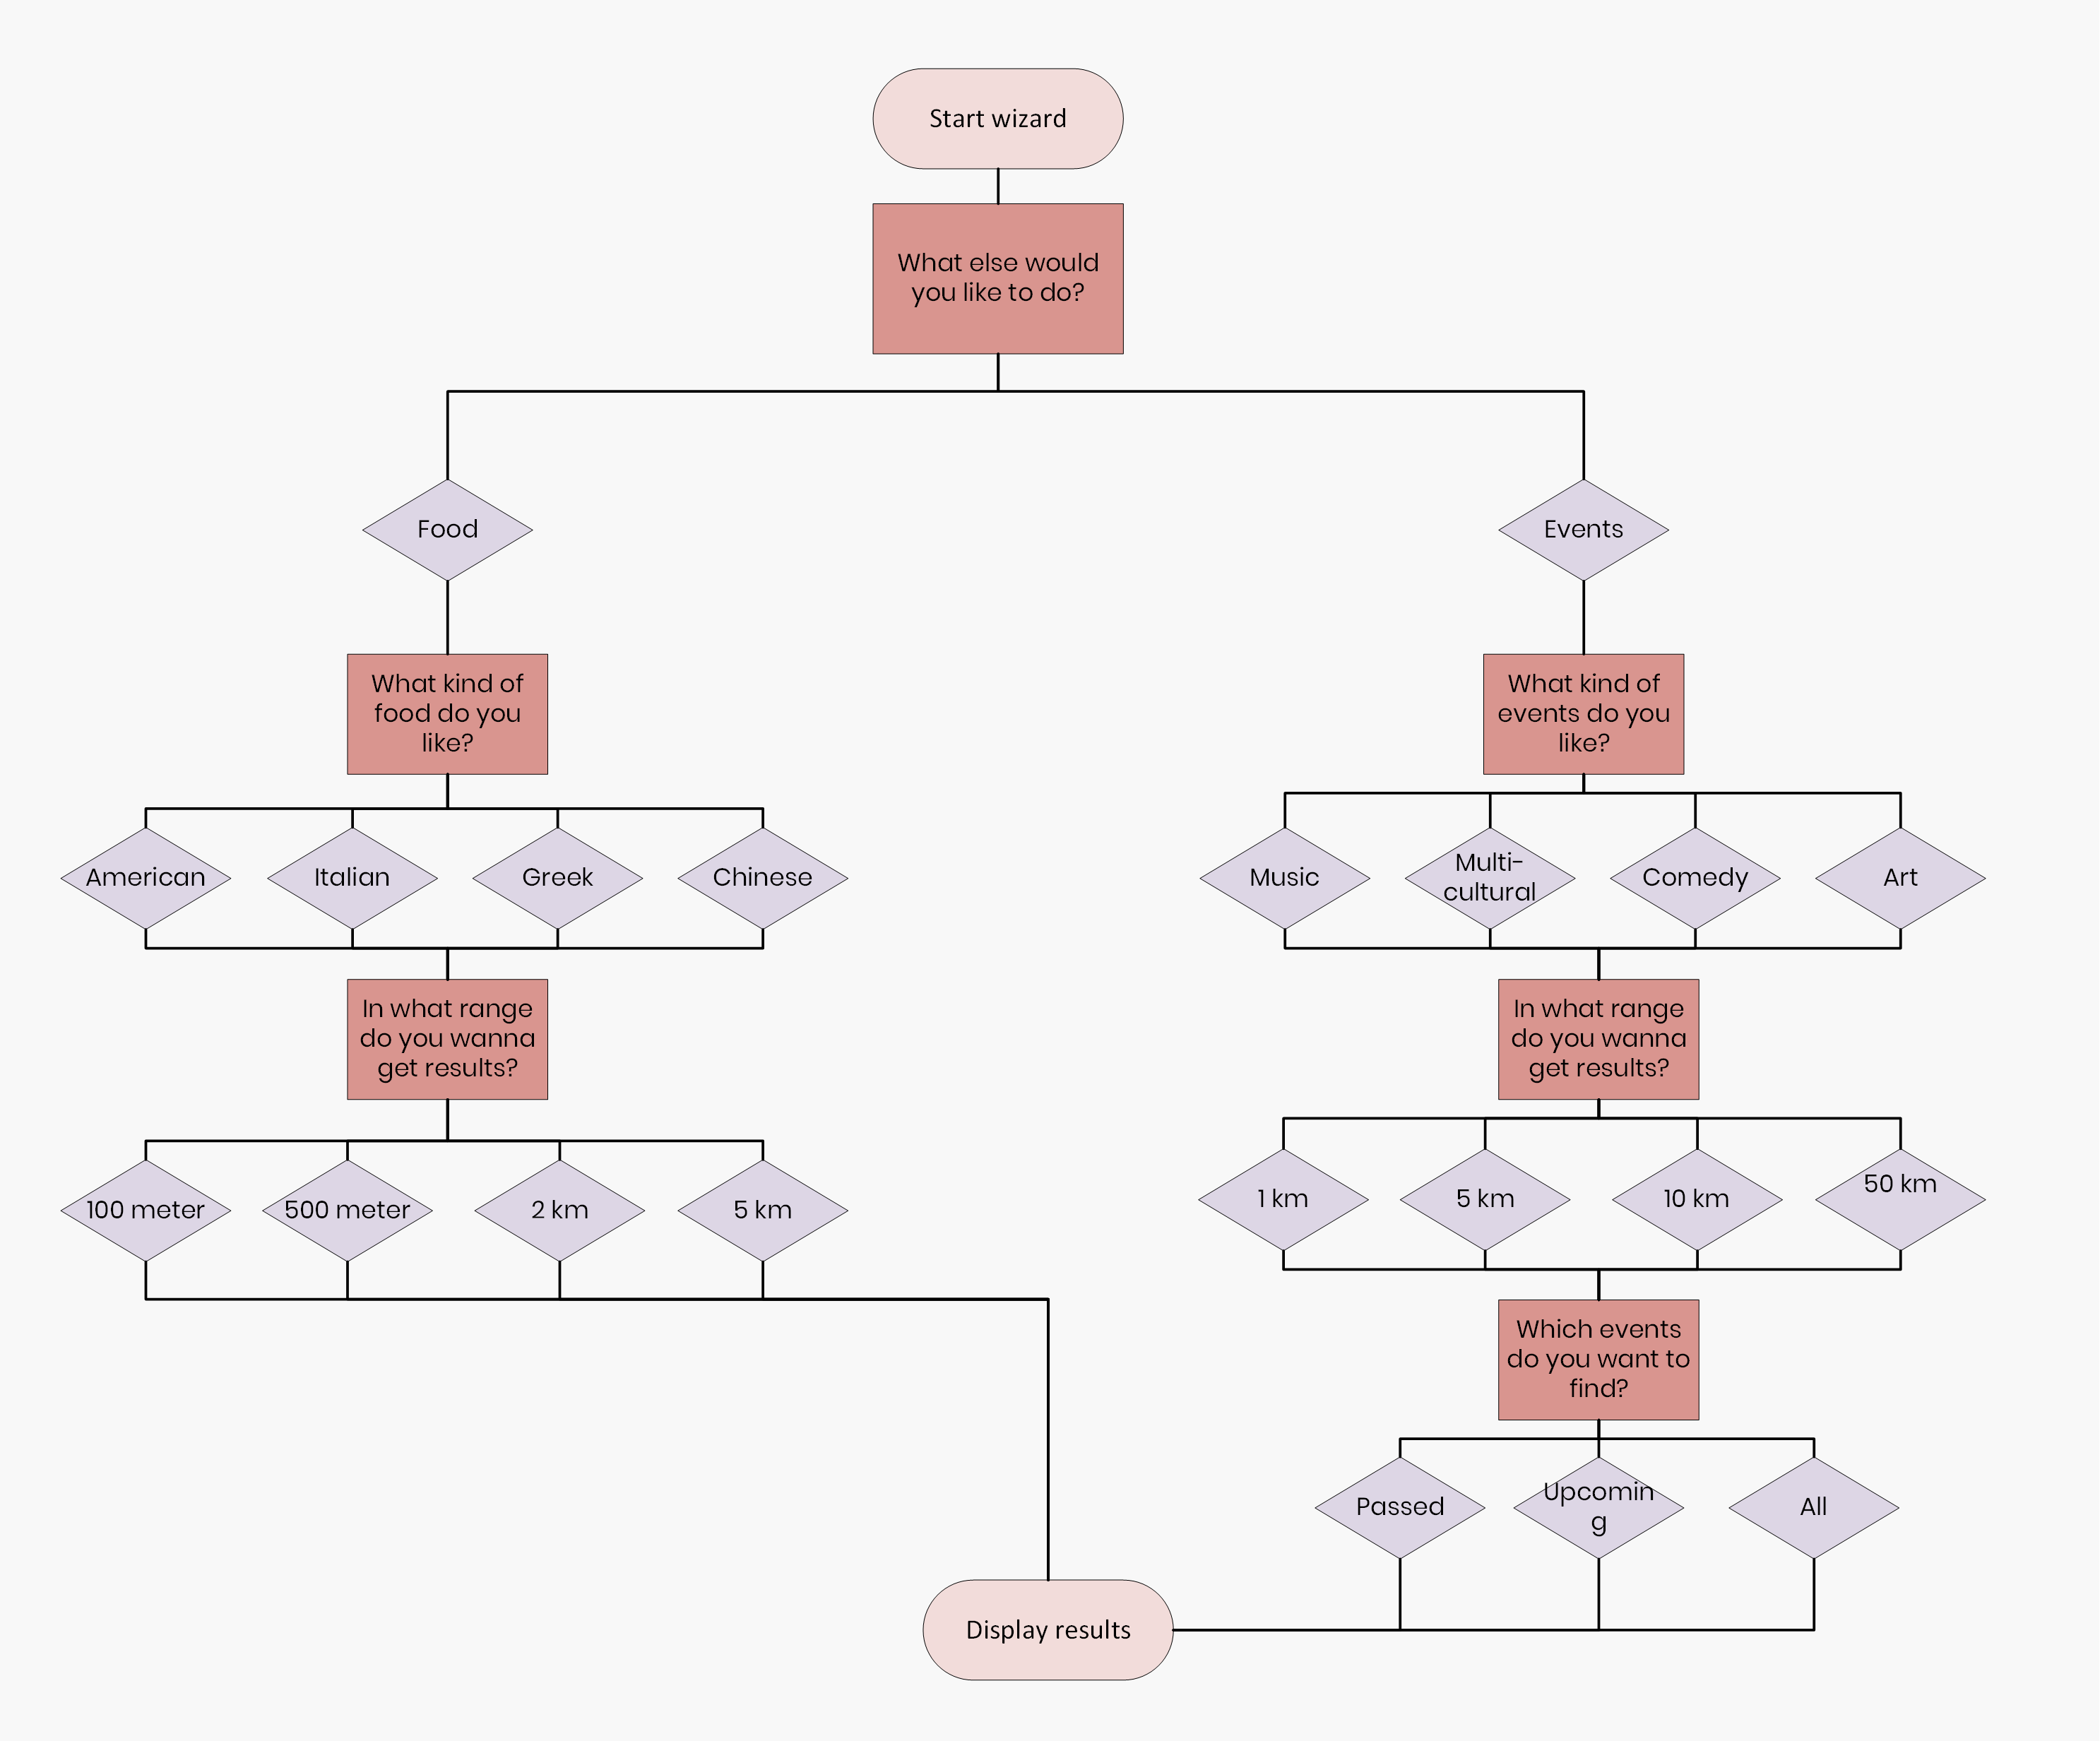
Tourists are the target audience for this part of the solution. They can take a photo of a museum, building, store or something else. The photo will be processed by the Custom Vision service to recognize what has been photographed. Based on the outcome the Entity Search service is consulted to provide the tourist with some basic information about the building. After that, it's time to start the wizard. This will present the tourist some questions, like what else they want to see and some additional questions based on earlier given answers. When the tourist completes the wizard, results are displayed based on their given answers (interests). Below you’ll find a diagram of the questions and the answer options.
I'll explain separately what techniques and services were used for building the application features. Let’s start with the first feature, take a photo within the browser and let the Custom Vision Service determine what has been photographed.
How to use the device camera in the browser
The browser is getting more smarter and become more integrated into the
user's device. This means that the browser is getting more access to the
device hardware. For example, it is possible to use the device camera, USB
devices, etc. Things that currently are in development are recognizing NFC
enabled devices and using Bluetooth Low Energy. The way you can use the
device camera is very easy. The
navigator.MediaDevices object has access to
the device camera and can activate it after the user gave consent. The
HTML5 includes the <video /> element
that can be used to stream the camera input. The
getUserMedia method (defined on the
MediaDevice object) accepts an optional
parameter that defines whether or not you want to use audio or which
camera you want to use (in case of a mobile, front or back camera). To
take a photo the video can be stopped and the image can be drawn on a<canvas />
element.
private constraints = {
        audio: false,
        video: { facingMode: { exact: 'environment' } },
};

// start camera
navigator.mediaDevices.getUserMedia(this.constraints)
        .then((stream) => {
                this.player.current.srcObject = stream;
 });

// Draw the video frame to the canvas.
const context = this.canvas.current.getContext('2d');
context.drawImage(this.player.current, 0, 0, this.canvas.current.width, this.canvas.current.height);

this.player.current.srcObject.getVideoTracks().forEach(track => track.stop());
Using the device camera to take a photo from within the browser is one
thing. However, I also want to store the taken photo somewhere. Azure Blob
storage looks like the best place for it. Since this is a client-side
application, I used the
azure-storage
NPM package. This package is maintained by Microsoft and yet is still in
preview. This package allows us to upload a blob (get blob from
<canvas /> element) to a storage account
with JavaScript.
const blobService = AzureStorage.Blob.createBlobService('UseDevelopmentStorage');
const img = this.canvas.current.toDataURL('image/jpeg', 1.0).split(',')[1];
const buffer = new Buffer(img, 'base64');
const fileName = `${new Date().getTime()}.jpg`;

blobService.createBlockBlobFromText(
	'user-images',
	fileName,
	buffer,
	{contentType:'image/jpeg'},
	(error, result, response) => {
		if (!error) {
			const url = `https://*.blob.core.windows.net/user-images/${fileName}`;

			this.canvas.current.toBlob((blob: Blob) => {
				this.props.closeModal(url, blob);
			});
		}
	}
);
Use the Custom Vision Service to determine what has been photographed
Microsoft Cognitive Services makes it super easy to use AI in your own solution. The toolset includes services like searching for images and entities, analyzing images for recognizing objects or faces, language or speech services, etc. The default Vision service allows us to upload an image which will be analyzed and it returns a JSON object that holds detailed information about the image. For example, if an image contains any faces, what the landscape is, what the recognized objects are, etc. See my previous blog post for an example of an image and the results that are returned by the service.
The Custom Vision service will give you more control of what specifically should be recognized in an image. The way it works is that in the portal of the Custom Vision service you have the option to upload images and tag them. Let’s, for instance, pretend that you want to recognize if uploaded images are either a Mercedes or a Bentley car. You’ll need to create two tags, Mercedes and Bentley, upload images and connect them to the respective tags. After that, it’s time to train the model. Under the hood, machine learning is used to train and improve the model. The more images you upload the more accurate the model becomes and that’s how it works with most of the machine learning models. In the end, it’s all about data and verifying your model. After the model is all set, it’s time to upload images and test the results. The Custom Vision service analyze the images and return the tags with a probability percentage.
The Custom Vision service provides an API that can be consulted to access the service directly in code. The admin part, what I’ll cover later, is using the API to tag and upload images and to train the model. The tourist application takes the photographed image and uploads it to the Custom Vision service which will return a list of tags and their prediction score. See below the HTTP POST request and the response.
POST https://southcentralus.api.cognitive.microsoft.com/customvision/v1.1/Prediction/[PROJECTID]/image?iterationId=[ITERATIONID] HTTP/1.1
Host: southcentralus.api.cognitive.microsoft.com
Connection: keep-alive
Content-Length: 461760
Accept: application/json, text/plain, */*
Prediction-key: [PREDICTIONKEY]
Content-Type: multipart/form-data
{
"Id": "4e4a8b25-f5ff-4615-8f99-21d4fcce9b18",
"Project": [PROJECTID],
"Iteration": [ITERATIONID],
"Created": "2018-07-29T18:30:20.3319556Z",
"Predictions": [
{
"TagId": "d84f63a1-56f2-43f6-a24c-e5f1ff601c57",
"Tag": "science center nemo",
"Probability": 0.943902731
},
{
"TagId": "16de34cd-4340-4742-bb71-16b0168aa8a3",
"Tag": "rijksmuseum",
"Probability": 0.05609724
}
]
}Search for entity information with the Entity Search service
The Entity Search service can be used to get results for specific entities or places. The API will try to return only one relevant entity result which is called the dominant entity. If it doesn’t find one relevant entity it will return a list of entity results which are called disambiguation entities. Below an example of an API call and the returned results.
GET https://api.cognitive.microsoft.com/bing/v7.0/entities?q=science%20center%20nemo&mkt=en-us HTTP/1.1
Host: api.cognitive.microsoft.com
Connection: keep-alive
Accept: application/json, text/plain, */*
Ocp-Apim-Subscription-Key: [ENTITYSEARCHKEY]
{
"_type": "SearchResponse",
"queryContext": {
"originalQuery": "science center nemo"
},
"entities": {
"value": [
{
"id": "https:\/\/www.bingapis.com\/api\/v7\/#Entities.0",
"contractualRules": [
{
"_type": "ContractualRules\/LicenseAttribution",
"targetPropertyName": "description",
"mustBeCloseToContent": true,
"license": {
"name": "CC-BY-SA",
"url": "http:\/\/creativecommons.org\/licenses\/by-sa\/3.0\/"
},
"licenseNotice": "Text under CC-BY-SA license"
},
{
"_type": "ContractualRules\/LinkAttribution",
"targetPropertyName": "description",
"mustBeCloseToContent": true,
"text": "Wikipedia",
"url": "http:\/\/en.wikipedia.org\/wiki\/NEMO_(museum)"
},
{
"_type": "ContractualRules\/MediaAttribution",
"targetPropertyName": "image",
"mustBeCloseToContent": true,
"url": "http:\/\/en.wikipedia.org\/wiki\/NEMO_(museum)"
}
],
"webSearchUrl": "https:\/\/www.bing.com\/entityexplore?q=NEMO&filters=sid:%22dbfe3c17-a953-36c0-212e-0214352ad56d%22&elv=AXXfrEiqqD9r3GuelwApulokPQDf!JZGFScudBHWEhsBhhnVNBc2i4jtA6B0jTQe**JYjoTT1XxJM78ncLTqwzBd9vVFzx0ALrNQamxfSDS*",
"name": "NEMO",
"image": {
"name": "NEMO",
"thumbnailUrl": "https:\/\/www.bing.com\/th?id=A9c0de0f0e2d6e715f18d9d1ec43e825d&w=110&h=110&c=7&rs=1&qlt=95&cdv=1&pid=16.1",
"provider": [
{
"_type": "Organization",
"url": "http:\/\/en.wikipedia.org\/wiki\/NEMO_(museum)"
}
],
"hostPageUrl": "http:\/\/upload.wikimedia.org\/wikipedia\/commons\/d\/dd\/NEMO_%28Amsterdam%29.jpg",
"width": 110,
"height": 110,
"sourceWidth": 300,
"sourceHeight": 225
},
"description": "NEMO Science Museum is a science center in Amsterdam, Netherlands. It is located in the Oosterdokseiland neighborhood in the Amsterdam-Centrum borough, situated between the Oosterdokseiland and the Kattenburg. The museum has its origins in 1923, and is housed in a building designed by Renzo Piano since 1997. It contains five floors of hands-on science exhibitions and is the largest science center in the Netherlands. It attracts annually over 500,000 visitors, which makes it the fifth most visited museum in the Netherlands.",
"entityPresentationInfo": {
"entityScenario": "DominantEntity",
"entityTypeHints": [
"Attraction",
"Organization"
]
},
"bingId": "dbfe3c17-a953-36c0-212e-0214352ad56d"
}
]
},
"rankingResponse": {
"sidebar": {
"items": [
{
"answerType": "Entities",
"resultIndex": 0,
"value": {
"id": "https:\/\/www.bingapis.com\/api\/v7\/#Entities.0"
}
}
]
}
}
}To come back to our solution, the tag with the highest prediction score (which is returned by the Custom Vision service) is sent to the Entity Search API. The response of the API is presented to the tourist. To summarize the flow, the tourist takes a photo from a building, the photo is processed by the Custom Vision service, then the Entity Search API is consulted to present the tourist information about the building. Tourists are taking photos anyway so why not use that photo to provide them immediately information about buildings, museums or even restaurants (can be basically everything). Nowadays people want to plan their own time and don’t want to be dependent on organized tours in order to get more information. After the tourist has photographed a building and discovered what kind of building it is, it's time to go to the next city highlight and that is where the wizard comes in. The wizard is built with Azure Durable Functions and I’ll cover this in the next section.
Building workflows with Azure Durable Functions
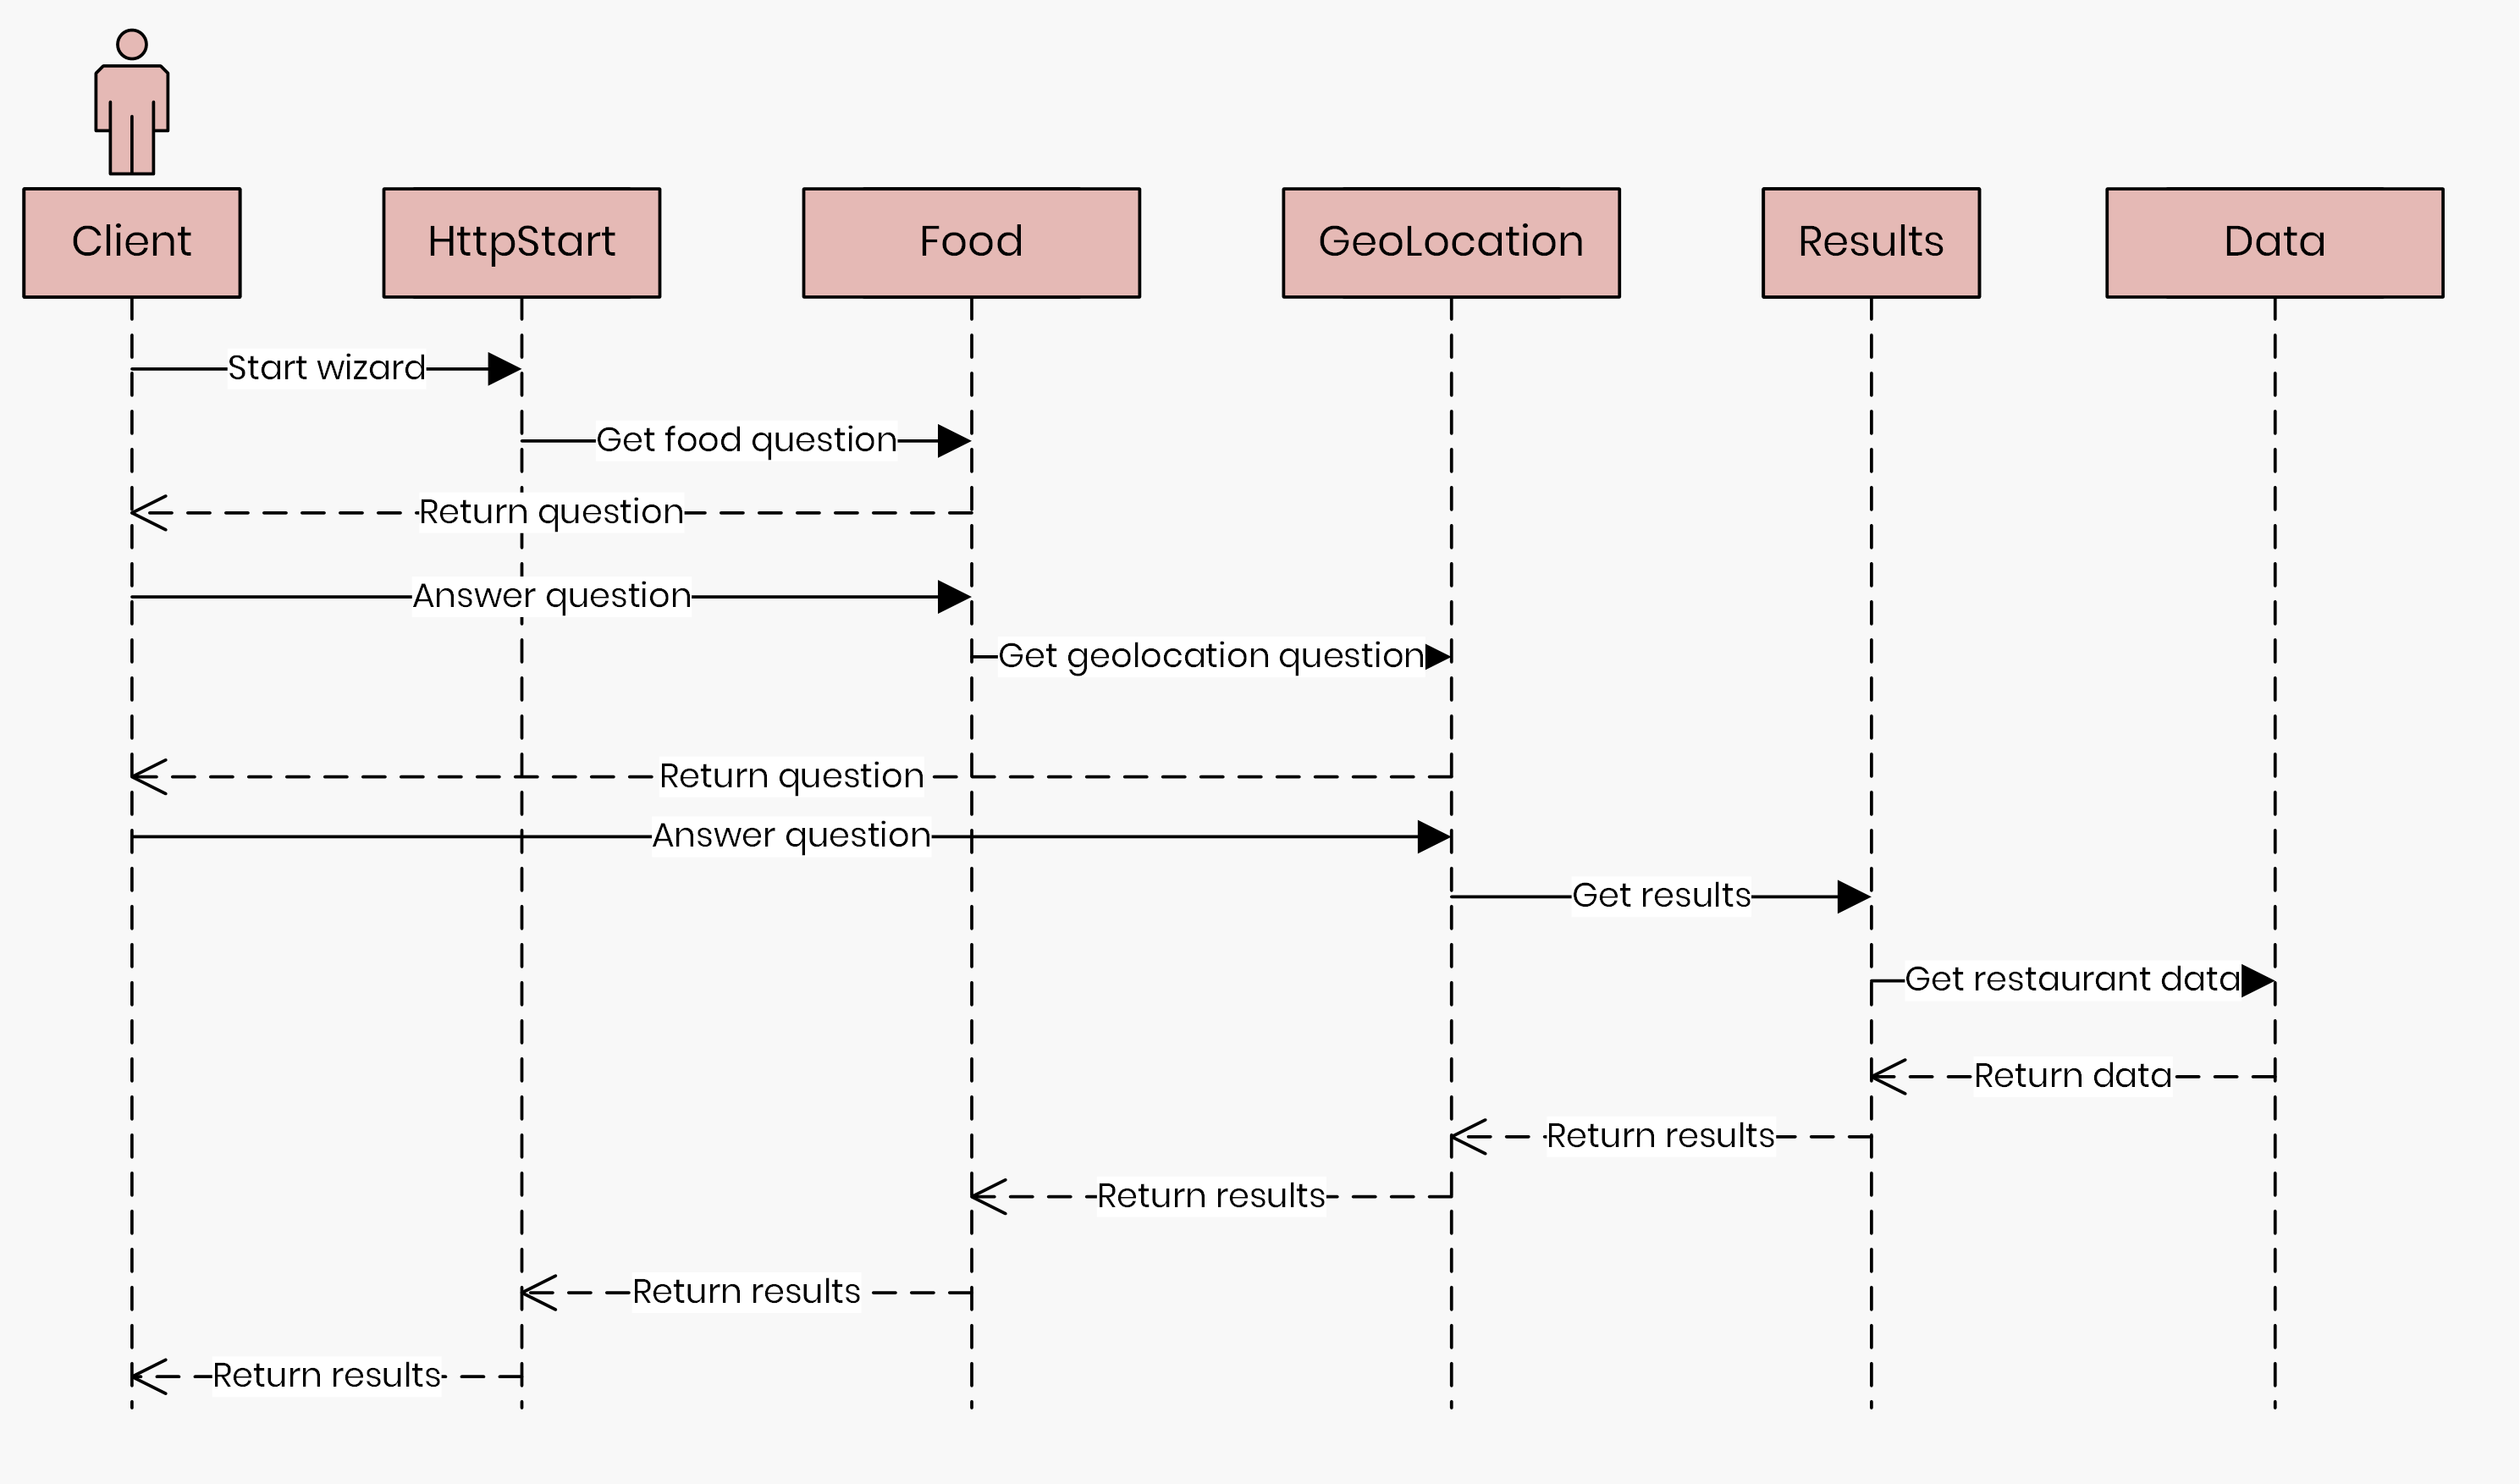
In 2017, Microsoft released Durable Functions. It gives us the ability to write long running stateful function orchestrations. This new feature lets us write stateful functions that can trigger other functions and wait for the result. It’s like chaining functions, what I explained in my previous blog post by using queues. In that solution, functions were triggered when a new item was placed on the queue. You can read the blog post here. With function orchestrations this becomes much easier, now it’s possible to call functions in a function. It’s even possible to wait for an event and then continue with the logic of a function. Under the hood, queues and tables are used to build stateful functions and to wait for other functions and for events to occur. Instead of building this yourself this is now publicly available by installing one single NuGet package Microsoft.Azure.WebJobs.Extensions.DurableTask. Before I dive into the technique first a sequence diagram of the Azure Durable Functions solution. Each object (except for the client who is the tourist) are the created functions. The messages that are labeled with 'Answer question' are events that are fired. I'll explain how events work in Azure Functions later.
As you can see there are a lot of functions and you may wonder is it really necessary to have so many? It’s probably also possible with fewer functions and that is true. However, we want our functions to be as isolated as possible. In some occasion, you might want to run them in parallel. For example, when you want to move ten files, instead of iterating to all files and call a function to move it, you can call that function in parallel for all files. In the best case, each function is responsible for one single task. With the release of Durable Functions, it’s possible to make them depended on each other. For example, you can call another function and wait for the result without that it affecting costs. What does that mean? Pretend you’ve two functions A and B. Function A takes 300 milliseconds to execute, Function A calls Function B and waits for the result. Function B executes in 700 milliseconds. You may think that the complete execution time of Function A is 1000 milliseconds and you will be charged for this. However, this is not true because for Function A you’ll only be charged for the 300 milliseconds execution time. The execution of Function B will be charged separately. Let’s take a look at how functions orchestrations work in code.
First thing is to define a starting point which is an Azure Function
decorated with the
OrchestrationClient attribute. This is just a
normal function and can be triggered in different ways, in my solution
this is an HTTP request. The route of the function contains the name of
the first function it needs to execute. Like normal functions, it’s
possible to pass parameters to the starter function. This function will
wait for the result of the function that is called. It’s not actually
waiting, under the hood it’s using Table Storage to save the state of the
function. This behavior is a bit different then what you normally expect
of an async / wait operation. Below the implementation of the starter
function.
public static class HttpStart
{
	[FunctionName("HttpStart")]
	public static async Task<HttpResponseMessage> Run(
		[HttpTrigger(AuthorizationLevel.Anonymous, methods: "post", Route = "orchestrators/{functionName}")] HttpRequestMessage req,
		[OrchestrationClient] DurableOrchestrationClientBase starter,
		string functionName,
		ILogger log)
	{
		dynamic eventData = await req.Content.ReadAsAsync<object>();
		string instanceId = await starter.StartNewAsync(functionName, eventData);

		var res = starter.CreateCheckStatusResponse(req, instanceId);
		res.Headers.RetryAfter = new RetryConditionHeaderValue(TimeSpan.FromSeconds(10));
		return res;
	}
}
So when the tourist presses the ‘Start wizard’ button an HTTP request is executed to trigger the starter function and the request includes the first function that should be executed. Like I said, it waits until the first function is executed. However, the starter function already response with sending back the unique identifier and URLs back to the client.
{
"id":"e2187828b06c4992a43b373e8fa1af9f",
"statusQueryGetUri":"http://localhost:7071/admin/extensions/DurableTaskExtension/instances/e2187828b06c4992a43b373e8fa1af9f?taskHub=DurableFunctionsHub&connection=Storage&code=/EkzC0aOvmBh7K2GT5akF33wJav064WbpGROGSMZ66rJDPZUdRtxEQ==",
"sendEventPostUri":"http://localhost:7071/admin/extensions/DurableTaskExtension/instances/e2187828b06c4992a43b373e8fa1af9f/raiseEvent/{eventName}?taskHub=DurableFunctionsHub&connection=Storage&code=/EkzC0aOvmBh7K2GT5akF33wJav064WbpGROGSMZ66rJDPZUdRtxEQ==",
"terminatePostUri":"http://localhost:7071/admin/extensions/DurableTaskExtension/instances/e2187828b06c4992a43b373e8fa1af9f/terminate?reason={text}&taskHub=DurableFunctionsHub&connection=Storage&code=/EkzC0aOvmBh7K2GT5akF33wJav064WbpGROGSMZ66rJDPZUdRtxEQ=="
}
The statusQueryGetUrl can be used to poll the
status of the StartWizardFunction. Like the
name reveals the sendEventPostUrl can be used
to trigger an event. And of course, there is the option to terminate a
function.
Like I said the first function is the
StartWizardFunction. The client application
will start polling (statusQueryGetUrl)
this function to determine if the function has been completed and to get
the results. I know polling is not a very nice solution, but since
there isn’t yet a better alternative I’ll go for this. I do need to make a
note that Anthony Chu started a
GitHub repository
that supports the use of Signalr with Azure Functions. Probably a better
solution to replace polling in the future. So the
StartWizardFunction will eventually return the
results back to the client. I’m saying ‘eventually’ here since the
StartWizardFunction is calling another
function and waits for the result. And that function can call another
function, see the sequence diagram above. Below the code for the
StartWizardFunction.
[FunctionName("StartWizard")]
public static async Task<WizardResult> Run([OrchestrationTrigger] DurableOrchestrationContext context)
{
	var coordinates = context.GetInput<Coordinates>();

	var wizardStep = new WizardStep
	{
		Id = Guid.NewGuid().ToString(),
		Event = "step-1-answer",
		Question = "What else would you like to do?",
		Answers = new[]
		{
			new Answer {Id = Guid.NewGuid().ToString(), Text = "Food", Value = "food"},
			new Answer { Id = Guid.NewGuid().ToString(), Text = "Events", Value = "events" },
			new Answer { Id = Guid.NewGuid().ToString(), Text = "Attractions", Value = "attractions" }
		}
	};

	context.SetCustomStatus(wizardStep);

	var step1Answer = await context.WaitForExternalEvent<Answer>(wizardStep.Event);

	WizardResult result = null;
	switch (step1Answer.Value)
	{
		case "food":
			result = await context.CallSubOrchestratorAsync<WizardResult>("WizardFoodFunction", step1Answer.Id, new FoodInputCriteria { VisitorCoordinates = coordinates });
			break;
		case "attractions":
			result = await context.CallSubOrchestratorAsync<WizardResult>("WizardAttractionFunction", step1Answer.Id, new AttractionInputCriteria { VisitorCoordinates = coordinates });
			break;
		case "events":
			result = await context.CallSubOrchestratorAsync<WizardResult>("WizardEventFunction", step1Answer.Id, new EventInputCriteria { VisitorCoordinates = coordinates });
			break;
	}
	return result;
}
And below the JSON response of calling the
statusQueryGetUrlURL.
{
  "instanceId": "e2187828b06c4992a43b373e8fa1af9f",
  "runtimeStatus": "Running",
  "input": {
    "latitude": 52.379189,
    "longitude": 4.899431
  },
  "customStatus": {
    "id": "d4fbf7e1-8b1c-44ce-9b4e-b00c50c66a8f",
    "question": "What else would you like to do?",
    "answers": [
      {
        "id": "5ae086b6-482a-413b-8d89-c1ef760348cb",
        "text": "Food",
        "value": "food"
      },
      {
        "id": "76ba37b9-81b5-4431-b6f0-8b6449de4079",
        "text": "Events",
        "value": "events"
      },
      {
        "id": "5aad6859-93eb-4fe2-903f-142cdddf2e76",
        "text": "Attractions",
        "value": "attractions"
      }
    ],
    "event": "step-1-answer",
    "isLastQuestion": false
  },
  "output": null,
  "createdTime": "2018-07-29T18:45:07Z",
  "lastUpdatedTime": "2018-07-29T18:45:10Z"
}
As you can see the StartWizard function accepts input values, in this
case, these are the geo-coordinates of the visitor which are retrieved by
calling navigator.geolocation.getCurrentPosition
in JavaScript. I’ll come back later where I’m using these coordinates. In
the function, I’m constructing the first wizard question and calling the
SetCustomStatus method to make sure that the
question model is returned back to the client (see JSON response above).
Just after that, I’m waiting for an event that occurs which is basically
waiting for the tourist to answer the question. Again the
sendEventPostUrl can be used to trigger
events. Below the request to trigger the answer event.
POST http://localhost:7071/admin/extensions/DurableTaskExtension/instances/e9285409db8a4698b8087dbcf85a564f/raiseEvent/step-1-answer?taskHub=DurableFunctionsHub&connection=Storage&code=/EkzC0aOvmBh7K2GT5akF33wJav064WbpGROGSMZ66rJDPZUdRtxEQ== HTTP/1.1
Content-Length: 74
Accept: application/json, text/plain, */*
Content-Type: application/json;charset=UTF-8

{"id":"f4585d47-82eb-44a0-9548-a2bac24efc2b","text":"Food","value":"food"}
Depending on the posted data (the given answer) a new function is called.
In this blog post, I focus on the food answer, but the other possible
answers are attractions or events. The idea of the function orchestration
is to collect information (answers) of the tourist and save that in the
FoodInputCriteria model. This model is passed
between the functions. The last function which is responsible for getting
and filtering results will look up for the best results based on the
FoodInputCriteria model. Basically, the next
functions (until the last one) return new questions, waiting for the
answer event, enriching the
FoodInputCriteria model and calling a new
function. For example, the tourist needs to answer what kind of food they
like and in what distance range they want to get back results.
public class FoodInputCriteria
{
	public string Key => "Food";
	public string Category { get; set; }
	public double Range { get; set; }
	public Coordinates VisitorCoordinates { get; set; }
}
After the last answered question theGetFoodResultFunction is called. This function will return the results based on the
FoodInputCriteriaModel. Below the code of the
last function.
[FunctionName("GetFoodResultFunction")]
public static async Task<WizardResult> GetResult(
    [OrchestrationTrigger] DurableOrchestrationContext context)
{
    var criteria = context.GetInput<FoodInputCriteria>();

    var items = await context.CallActivityAsync<IEnumerable<ResultModel>>("DataFunction", DataType.Food);

    items = items
        .Where(x => x.Details.En.LongDescription.Contains(criteria.Category))
        .Where(
            x =>
                x.Location != null &&
                WithinDistance(x.Location.Latitude, x.Location.Longitude, criteria.VisitorCoordinates,
                    criteria.Range));

    var result = new WizardResult
    {
        Title = criteria.Key,
        Text = "Based on your interests we've found these results."
    };
    result.Items = items.Select(x => WizardResultItem.From(x));

    return result;
}
In this function, you see that I’m calling the
DataFunction as an activity which indicates
this function doesn’t call any other functions. The
DataFunction is responsible for getting data
from a JSON file located in Azure Storage. I downloaded three JSON files,
one for food options, attractions and events from the Amsterdam Open Data
platform. The FoodInputCriteriaModel is used
for querying the data on food category and distance range. Since this is
the last function in the chain and we don’t have to wait for any other
operation to be executed, this result is given back by to our first
function in the chain, the
StartWizardFunction. The polling process
(statusQueryGetUrl) will now receive the below
JSON response back. As you can see the output property is now set with the
results.
{
  "instanceId": "2d12c73d1ede4ce7b2ce585072bfab88",
  "runtimeStatus": "Completed",
  "input": {
    "latitude": 52.37502,
    "longitude": 4.9117377
  },
  "customStatus": {
    "id": "f9fbfe8f-ad7c-4a40-b0f4-0639edefa983",
    "question": "What else would you like to do?",
    "answers": [
      {
        "id": "984fe6a2-839d-4657-bfe8-067c63f09747",
        "text": "Food",
        "value": "food"
      },
      {
        "id": "be668535-c6ea-45a5-978c-0558915a340d",
        "text": "Events",
        "value": "events"
      },
      {
        "id": "65668f86-0e35-469c-b2c0-936dbe8dbf55",
        "text": "Attractions",
        "value": "attractions"
      }
    ],
    "event": "step-1-answer",
    "isLastQuestion": false
  },
  "output": {
    "title": "Food",
    "text": "Based on your interests we've found these results.",
    "items": [
      {
        "title": "Mazzo",
        "introduction": "Mazzo brings a welcoming Italian living-room into Amsterdam\u2019s bohemian Jordaan district. The simple, relaxed space \u2013 an authentic Italian concept \u2013 is one where everyone, young and old, can eat, drink, work, and socialise from early morning till late at night.\n",
        "image": "https:\/\/media.iamsterdam.com\/ndtrc\/Images\/4b\/4b7c1f5c-ba44-425c-afe5-3ea8a67515af\/b84c17bc-6406-4f0b-b39a-b56042cd06ee.jpg"
      },
      {
        "title": "Da Portare Via",
        "introduction": "Da Portare Via creates true Roman pizzas in Amsterdam - thin crust,topped with the best ingredients and slightly burnished from the intense heat of the wood-burning oven.\n\n\n\n",
        "image": "https:\/\/media.iamsterdam.com\/ndtrc\/Images\/20130926\/dac3ef98-2f57-4b78-b189-ce236783e6a3.jpg"
      },
      {
        "title": "Lazagne",
        "introduction": "The Dutch saying `klein maar fijn' (small but beautiful) is definitely applicable to Lazagne: you can enjoy delicious lasagnes at this small Italian takeaway in Amsterdam West.\n",
        "image": "https:\/\/media.iamsterdam.com\/ndtrc\/Images\/3e\/3eeee5fa-ee55-4f1a-922c-77b5687d8b41\/ad4458c1-cc29-4f1b-ac56-a42181fb663f.jpg"
      },
      {
        "title": "Renato's Osteria",
        "introduction": "The popular Renato\u2019s Pizzeria in De Pijp, Amsterdam, has expanded along the road with the opening of the new Renato\u2019s Osteria, where you can find good wine and simple, homemade pasta served in a homely atmosphere.\n",
        "image": "https:\/\/media.iamsterdam.com\/ndtrc\/Images\/c5\/c5a4c267-fbe1-411b-8dd0-d7261b915e2b\/449e4a89-4b26-4c3f-b059-1d4a8f9da311.jpg"
      },
      {
        "title": "De Italiaan",
        "introduction": "This pretty - and romantic, in a non-ostentatious way - little trattoria, which sits on a quiet, tree-lined corner of Oud West, is no regular pizza joint. ",
        "image": "https:\/\/media.iamsterdam.com\/ndtrc\/Images\/af\/af2511c6-2bed-43f1-89ba-d8245587083e\/6fe870c1-3517-42f4-a43b-847432b9543c.jpg"
      },
      {
        "title": "De Kleine Valk",
        "introduction": "Located on the vibrant Marie Heineken Square in the heart of De Pijp, De Kleine Valk is a welcoming restaurant with a modern and comfortable interior and a large outdoor terrace.",
        "image": "https:\/\/media.iamsterdam.com\/ndtrc\/Images\/b4\/b40fb1c6-fe7c-42bf-9003-c7525de393ed\/4af03423-c99a-4139-b0de-f74b9b2524f1.jpg"
      },
      {
        "title": "La Perla",
        "introduction": "La Perla is a pizza restaurant that only uses the best Italian ingredients and cooking methods. Based in Amsterdam's Jordaan neighbourhood, they import their ingredients straight from Italy every week.",
        "image": "https:\/\/media.iamsterdam.com\/ndtrc\/Images\/e9\/e9f3891e-487f-46d5-85e7-a41ab121f8b5\/2a4a9738-d1d2-4faf-81dd-0b7761ccfb38.jpg"
      },
      {
        "title": "Restaurant Classico",
        "introduction": "Restaurant Classico is nestled between the narrow, little streets of South Amsterdam, boasting authentic Italian cuisine, fine wines and a romantic atmosphere.",
        "image": "https:\/\/media.iamsterdam.com\/ndtrc\/Images\/1b\/1b0220e6-c1d2-4bc3-8082-35d17f39e4fa\/b1e58540-e771-4ac1-b46f-c60cfe0f114a.jpg"
      },
      {
        "title": "Barrica",
        "introduction": "Take a mini-vacation to the Mediterranean at this wine and food bar in Amsterdam Oud-West, offering small plates but a large menu.",
        "image": "https:\/\/media.iamsterdam.com\/ndtrc\/Images\/20\/20a17a66-c845-4a90-b3e0-9ba5fcb2aadf\/89fe2515-f998-4a7f-ac1e-ed494cf5ffae.jpg"
      }
    ]
  },
  "createdTime": "2018-08-04T10:54:54Z",
  "lastUpdatedTime": "2018-08-04T10:55:49Z"
}
Now, that I covered the tourist part of the solution, I’ll continue with the admin part in the next section.
Using the Custom Vision API to push data and train the model
The admin part of the application is responsible to tag and upload images and to train the Custom Vision model. The goal of the tourist solution is to have a very accurate response for the photos that are uploaded. In order to do so, the admin needs to train the model. Instead of that admins need to take thousands of photos of buildings in the city, I provide the admins the ability to search for images on the web. Why not use what’s already out there? Microsoft provides the Bing Image Search service which let you search for images on the web. Of course, we can't use every single image, need to keep in account licensing.
The flow for admins is very simple:
- Search for images of a specific building or city highlight
- Select the ones they want to use for the model
- Enter a tag name
- Press upload
- Press train
To implement this flow, I’m using two different services from the Microsoft Cognitive Services toolset, the Bing Image Search service, and the Custom Vision service. Again the client-side application is built with JavaScript only, ReactJS to be more specific. Below the HTTP request and JSON response to the Bing Image Search service.
GET https://api.cognitive.microsoft.com/bing/v7.0/images/search?q=Science%20center%20NEMO HTTP/1.1
Host: api.cognitive.microsoft.com
Accept: application/json, text/plain, */*
Ocp-Apim-Subscription-Key: [BINGIMAGESEARCHKEY]
{
"_type": "Images",
"instrumentation": {
"_type": "ResponseInstrumentation"
},
"readLink": "images\/search?q=Science center NEMO",
"webSearchUrl": "https:\/\/www.bing.com\/images\/search?q=Science center NEMO&FORM=OIIARP",
"totalEstimatedMatches": 750,
"nextOffset": 38,
"value": [
{
"webSearchUrl": "https:\/\/www.bing.com\/images\/search?view=detailv2&FORM=OIIRPO&q=Science+center+NEMO&id=5ABFFE1CF6DFC3C1FAAE89EB3DF6D770388CDDFD&simid=608041447451133268",
"name": "Science Center NEMO, Amsterdam - RueBaRue",
"thumbnailUrl": "https:\/\/tse1.mm.bing.net\/th?id=OIP.pcK0Vbzuz8CFWhXCzDSWoQHaE8&pid=Api",
"datePublished": "2015-05-21T01:19:00.0000000Z",
"contentUrl": "http:\/\/media.ruebarue.com\/photos\/places\/6491045277728768\/1-science-center-nemo-1.jpg",
"hostPageUrl": "http:\/\/www.ruebarue.com\/amsterdam\/attraction\/science-center-nemo\/6491045277728768",
"contentSize": "137745 B",
"encodingFormat": "jpeg",
"hostPageDisplayUrl": "www.ruebarue.com\/amsterdam\/attraction\/science-center-nemo...",
"width": 1200,
"height": 800,
"thumbnail": {
"width": 474,
"height": 316
},
"imageInsightsToken": "ccid_pcK0Vbzu*mid_5ABFFE1CF6DFC3C1FAAE89EB3DF6D770388CDDFD*simid_608041447451133268*thid_OIP.pcK0Vbzuz8CFWhXCzDSWoQHaE8",
"insightsMetadata": {
"pagesIncludingCount": 8,
"availableSizesCount": 3
},
"imageId": "5ABFFE1CF6DFC3C1FAAE89EB3DF6D770388CDDFD",
"accentColor": "123D84"
}
]
}There are a couple of things that need to keep in account when working with the Custom Vision service. The Custom Vision portal is available on this URL: https://www.customvision.ai. Of course, you can log in with your Microsoft account and immediately a free trial is activated to explore the service. After that, a new project can be created. Basically, the portal is split up into two sections, predictions and training. The training section is all about creating/ managing tags and uploading images to train the model. Note, that it’s mandatory that each tag has at least five images associated to it. If one of the tags does not meet this requirement you’ll be unable to train the model. You can upload as many images as you want (actually not in the trial modus) and every time you retrain the model a new iteration is created.
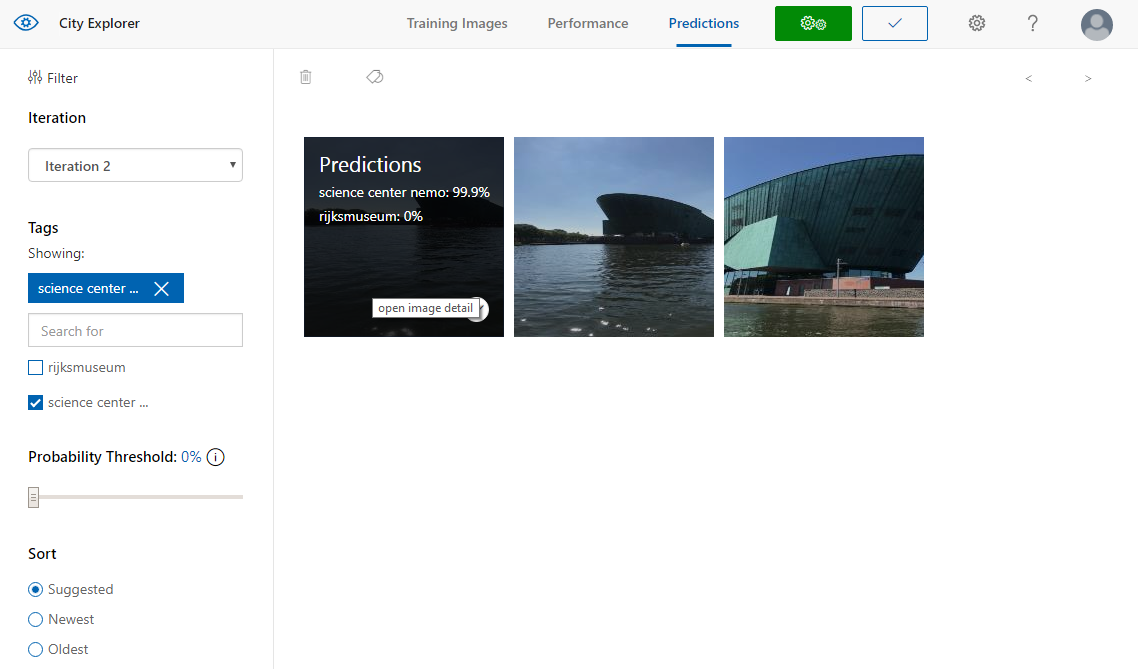
The prediction part of the portal is quite interesting. Per iteration, you can find the images that were uploaded and used against the prediction service. Per image, you see the tag prediction probability. To improve the model you can select the proper tag that should be associated with the image. Another option to improve the model is to upload images yourself in the portal and select the correct tag. The portal also provides some statistics (performance per tag) for each iteration.
There are a couple of different calls to the Custom Vision service that I'm doing in the admin solution. Below the HTTP request and response for the Custom Vision service in sequential order. First, retrieve all existing tags from the Custom Vision API to determine if a new tag should be created.
GET https://southcentralus.api.cognitive.microsoft.com/customvision/v1.2/Training/projects/[PROJECTID]/tags/ HTTP/1.1
Host: southcentralus.api.cognitive.microsoft.com
Connection: keep-alive
Training-key: [TRAININGKEY]
Accept: application/json, text/plain, */*
{
"Tags": [
{
"Id": "6e9a1358-b360-4666-87de-0871517f3e6a",
"Name": "science center nemo",
"Description": null,
"ImageCount": 16
},
{
"Id": "1ee2d9db-1491-46bd-9d9e-c93776108156",
"Name": "rijksmuseum",
"Description": null,
"ImageCount": 8
}
],
"TotalTaggedImages": 24,
"TotalUntaggedImages": 0
}Then upload the selected images and connect them to the defined tag.
POST https://southcentralus.api.cognitive.microsoft.com/customvision/v1.2/Training/projects/[PROJECTID]/images/urls HTTP/1.1
Host: southcentralus.api.cognitive.microsoft.com
Connection: keep-alive
Content-Length: 192
Training-key: [TRAININGKEY]
Accept: application/json, text/plain, */*
Content-Type: application/json

{
  "Images": [
    {
      "Url": "https:\/\/tse3.mm.bing.net\/th?id=OIP.Sme24Vz3AFFDpw5jE9wg0QAAAA&pid=Api",
      "TagIds": [
        "6e9a1358-b360-4666-87de-0871517f3e6a"
      ]
    }
  ],
  "TagIds": [
    "6e9a1358-b360-4666-87de-0871517f3e6a"
  ]
}
{
"IsBatchSuccessful": true,
"Images": [
{
"SourceUrl": "https:\/\/tse3.mm.bing.net\/th?id=OIP.Sme24Vz3AFFDpw5jE9wg0QAAAA&pid=Api",
"Status": "OK",
"Image": {
"Id": "191598e1-0d84-4f13-8e70-d27951bda115",
"Created": "2018-08-04T11:24:39.7579782",
"Width": 450,
"Height": 338,
"ImageUri": "https:\/\/irisscuprodstore.blob.core.windows.net\/i-e4ee1a8de3914b4e95964d4e420aa311\/i-191598e10d844f138e70d27951bda115?sv=2017-04-17&sr=b&sig=K1w8%2B0br7xePkSydSHHVUiIEkaERJvA29dOW%2BQDUiNw%3D&se=2018-08-05T11%3A24%3A39Z&sp=r",
"ThumbnailUri": "https:\/\/irisscuprodstore.blob.core.windows.net\/i-e4ee1a8de3914b4e95964d4e420aa311\/t-191598e10d844f138e70d27951bda115?sv=2017-04-17&sr=b&sig=GZ9fKYHrXfWRSo6y7x1tzUq%2FOciOTcZC3aJMLB9x%2FQU%3D&se=2018-08-05T11%3A24%3A39Z&sp=r",
"Tags": [
{
"TagId": "6e9a1358-b360-4666-87de-0871517f3e6a",
"Created": "2018-08-04T11:24:39.7808678"
}
]
}
}
]
}And of course, the last step, train the model.
POST https://southcentralus.api.cognitive.microsoft.com/customvision/v1.2/Training/projects/[PROJECTID]/train HTTP/1.1
Host: southcentralus.api.cognitive.microsoft.com
Connection: keep-alive
Training-key: [TRAININGKEY]
Accept: application/json, text/plain, */*
I’ll not cover all of the React code since that part is not the
focus of this blog post. However, if you’re interested in that you can
find the full source code of the solution (both tourist and admin part) on
my
GitHub repository.
Summarize
Quite a few techniques and services were covered in this blog post. The demo solution can be broken down into two parts, the tourist and admin application. The tourist can upload a photo of a building and let the application process that image. I’m using the Custom Vision service to determine what has been photographed. The Entity Search service is consulted to provide the tourist with basic information about the building they just photographed. The next step for the tourist is to start a wizard. This presents the tourist a couple of questions about what else they would like to do int he city. This can be seen as a simple workflow, questions are presented based on earlier given answers. The workflow is built with Azure Durable Functions. The city of Amsterdam provides the Open Data platform. This platform contains all kind of data, like restaurants, city highlights, or statistics like energy consumption and a lot more. I’m using this platform to display the tourist results based on their given answers.
The admin part can be used to train the Custom Vision model which is
being used to determine and recognize photos that are uploaded by
tourists. Admins can search for images with the Bing Image Search service,
tag them accordingly and eventually upload them to the Custom Vision
service. Lastly, they can train the model which improves the machine
learning model.
Please leave a comment below, I would love to get feedback and hear about your ideas.
 Twitter
 LinkedIn
 GitHub