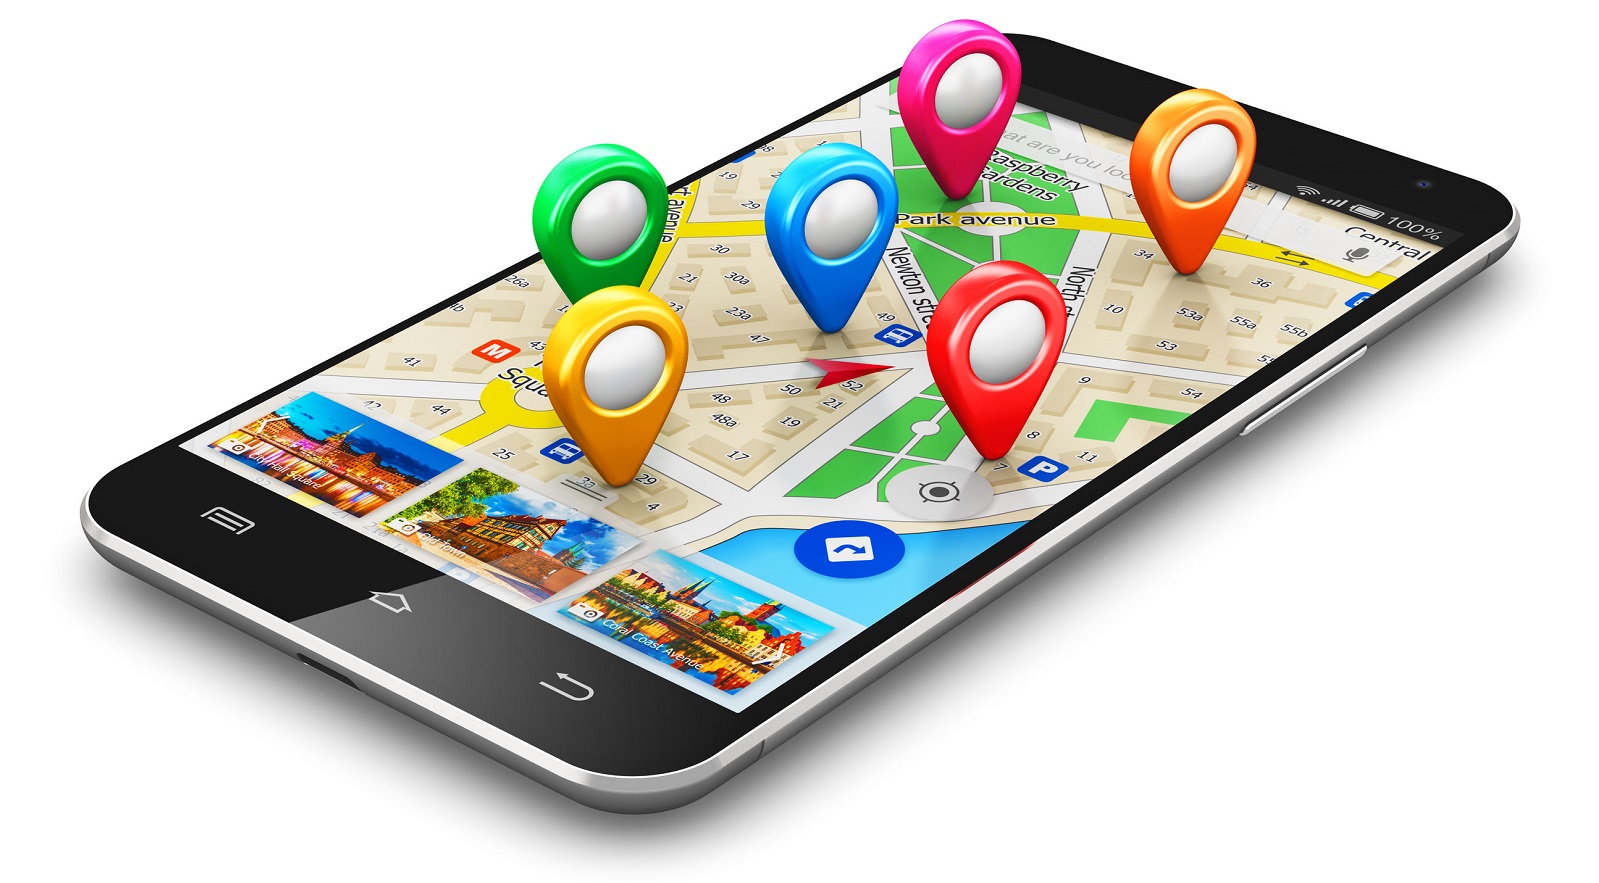
Use the power of Azure Functions and Cognitive Services to collect Geolocation information
In November 2016, Microsoft officially announced the availability of Azure Functions. After the availability of this new service, the term ‘serverless computing’ became a true hype. Serverless computing basically means that developers can focus on developing instead of worrying about the server architecture because that is managed and controlled by the cloud provider. In this blog, I'll explain how you can use Azure Functions to execute small isolated work. Like I normally do I’ll do this based on an example application. To make it more interesting the solution is triggered by the Amsterdam Open Beacon Network and contain some interesting topics like Microsoft Cognitive Services and ReactJS. I’ll guide you through all of these topics one by one. Let’s start with a great initiative of the city of Amsterdam by placing beacons all over the city.
Amsterdam Open Beacon Network
In 2016 Amsterdam started a pilot by placing approximately 300 beacons all over the city. It’s not the first time Amsterdam is innovating and trying new technologies. For that reason, Amsterdam can be found back in the top 20 of the 2016/2017 ‘Innovation Cities’ index. The main goal of this initiative is to improve navigation through the city and the accessibility and findability of city highlights. Beacons are small devices that can broadcast messages by using Bluetooth Low Energy. Devices like smartphones and smartwatches can listen to these messages.
Let me give you an example of a real-life solution. Every year Amsterdam is organizing ‘Museumnacht’ which give free access to everybody for one night to every museum. The company behind this event, N8, developed an app that provides information about the participating museums, but also real-time insights into the current number of visitors in each museum. You can probably imagine that a free event will attract a lot of people and that means long queues. The idea of this app is to divide visitors over the participating museums in order to prevent long queues. Several beacons are placed in the museum. The installed app registers when a user enters a museum by listening to messages broadcasted by beacons. The same thing happens when a user leaves a museum. Visitors can consult the app to see how many visitors are in a museum and by doing that they can choose to go to a museum that is less crowded.

The beacons that are placed in Amsterdam can be found near tourist highlights but also at public transportation stops. All beacons are managed in the Google Beacon Platform. Two types of beacons are used, iBeacon and Eddystone beacons. An iBeacon contains information like the UUID, major and minor. An Eddystone beacon contains a namespace and an instance id. Additional information about a beacon can be retrieved like the location of the beacon, name, address, and geo coordinates. This information can be fetched by using the Google Beacon Platform API. An alternative option is to download the full beacon list in a CSV file. In order to discover beacons, an app needs to be developed. First of all, I’m not an app developer so for discovering beacons I installed the app ‘Beacon Scanner’ which is available in the Google Play Store. This app simply scans all nearby beacons and provides the ability to log this in a file or by calling a webhook. Note, that only Android devices give you the ability to scan ‘all’ nearby beacons, iOS is a bit more strict and only let you discover beacons by passing a UUID, major and minor.
Discovering beacons will not work when sitting home behind a desk. So I went to Amsterdam and biked through the city with the Beacon Scanner app installed. I cycled to the locations where beacons are placed. Beacons can have range up to 70 meters so for most of the beacons it’s not necessary to be very close to it in order to discover it. A nice feature of the app is that it will show the distance between you and the beacon. I cycled to multiple locations to make sure I collected enough data. In the app, I configured to log beacons by calling a webhook. You probably already guessed it, but my webhook is built with Azure Functions, I’ll cover this in the next section.

Trigger an Azure Function by using webhooks
Azure Functions are perfect for executing small isolated work. A Function can be triggered in different ways, here some of the options:
- Blob trigger
- Event Hub trigger
- Service Bus trigger
- Generic Webhook
- Github Webhook
- Queue trigger
- Timer trigger
- HTTP trigger
The concept of a function is that it can accept an input and can return an output. Same goes for an Azure Function and a great benefit is that Microsoft made a seamless integration in Azure. For example, when you choose that your Function needs to be triggered when an item is placed in a queue you can define the type of the object as a parameter. That means it isn't necessary to deserialize from a string or cast to an object. When you tell Azure that your output is Table Storage you just return an object and it will automatically be inserted in the defined Table.
A Function can be created either in Visual Studio or in Azure. If you choose to do this in Azure you'll be using the online editor. I think most of the developer will use Visual Studio instead because it will give you access to all the plugin's and tools that are installed. Microsoft supports multiple programming languages to build Functions. At the moment of writing the options are C#, JavaScript, F#, Python, PHP, TypeScript, Batch, Bash, and PowerShell.
As I explained in the previous section whenever a beacon is discovered it will call a webhook with parameters (information about the beacon). In my case, the webhook is an Azure Function. As you can see in the code snippet below, the Function accepts a BeaconList type as a parameter. Automatically the HTTP request parameters are deserialized to a BeaconList type. The discovered beacon is stored in Table Storage so that I can prevent that a beacon will trigger the whole chain of Functions multiple times. That is necessary because I can't control how many times the Beacon Scanner calls the webhook for the same discovered beacon. The output of this Function is a queue.
       [FunctionName("BeaconWebhookFunction")]
        public static async Task Run(
            [HttpTrigger(AuthorizationLevel.Anonymous, "get", "post", Route = "BeaconWebhookFunction")]BeaconDataList beacons,
            [Queue("beacon-received-queue", Connection = "AzureWebJobsStorage")] IAsyncCollector<BeaconData> items,
            TraceWriter log,
            CancellationToken token)
        {
            if (beacons != null)
            {
                foreach (var beacon in beacons.Beacons)
                {
                    beacon.Identifier = GetBeaconIdentifier(beacon);

                    if (!IsAlreadyDiscovered(beacon))
                    {
                        SaveInLogTable(beacon);

                        await items.AddAsync(beacon, token);
                    }
                }
            }
            LogHelper.Log(log, $"BeaconWebhookFunction called: {Newtonsoft.Json.JsonConvert.SerializeObject(beacons)}");

            await items.FlushAsync(token);
        }
Below an example how the parameters of the HTTP request looks like.
{
  "beacons": [
    {
      "beaconAddress": "DF:47:7D:89:4F:17",
      "beaconType": "ibeacon",
      "ibeaconData": {
        "major": "10",
        "minor": "30141",
        "uuid": "2d30b3ba-ab4c-4fdc-8a4e-72745169a572"
      },
      "isBlocked": false,
      "lastMinuteSeen": 25347298,
      "lastSeen": 1520837924682,
      "distance": 12.603626901607,
      "rssi": -88,
      "hashcode": 285495343,
      "manufacturer": 76,
      "txPower": -58
    }
  ],
  "reader": ""
}
Like I said this is the first function in the chain, in total I created six different functions to collect information. Basically, I’m creating a chain of Azure Functions that are triggered by a queue. Each function executes code to enrich the data by using different external APIs. Below a data flow diagram of the communication between the functions.
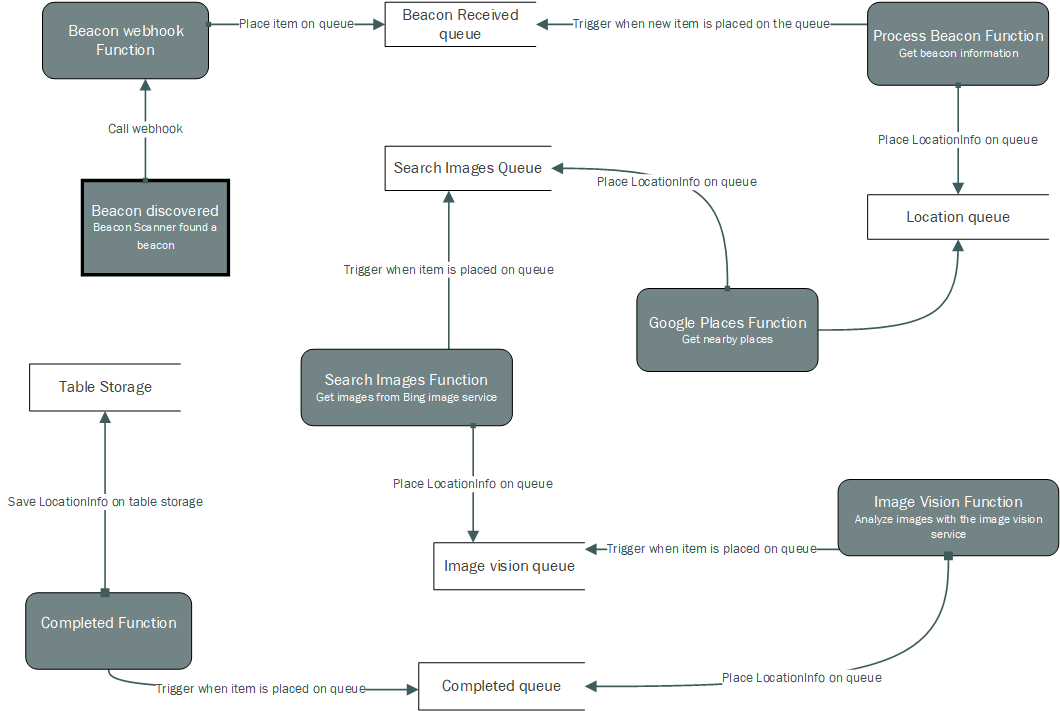
Building a chain of Azure Functions which are triggered by a queue message
The ProcessBeaconFunction is triggered when a new item is placed in the queue. Like I said earlier the Google Beacon Platform API can be used to get more information about beacons. An alternative is to download a CSV file that contains a complete list of all installed beacons by Amsterdam. I did the latter and in this function, I’ll try to see if the discovered beacon is one of the beacons that was installed by the city of Amsterdam. If this is true then I create a new LocationInfo object and set the beacon information and some extra information like the name and the geo-coordinates. I’m calling the Google Maps API to reverse the coordinates to a readable address. Finally, I’m placing the LocationInfo object in a new queue called location-queue. This will trigger again a new function that will gather more information about the current location of where the beacon was discovered.
        [FunctionName("ProcessBeaconFunction")]
        [return: Queue("location-queue", Connection = "AzureWebJobsStorage")]
        public static async Task<LocationInfo> Run(
            [QueueTrigger("beacon-received-queue", Connection = "AzureWebJobsStorage")]BeaconData beacon,
            TraceWriter log,
            ExecutionContext context)
        {
            var info = await GetInfo(log, beacon, context);
            if (info != null)
            {
                info.Address = await GetAddress(info.Coordinates);
                info.Date = DateTime.UtcNow;

                LogHelper.Log(log, $"ProcessBeaconFunction called: beacon: {Newtonsoft.Json.JsonConvert.SerializeObject(info)}");

                return info;
            }
            else
            {
                LogHelper.Log(log, "ProcessBeaconFunction called: unkown beacon");
            }
            return null;
        }
Use Azure Functions to enrich data by calling external services
As the name reveals, the GooglePlacesFunction is responsible to find nearby places by geo coordinates that are defined on the LocationInfo object. For searching nearby places I’m using the Google Places API. I call this service with the parameters geo coordinates, the type 'point_of_interests', and a radius of 100 meters. The service returns a list of places and for each place, I get the following information:
- Name
- Geo-coordinates
- Rating
- Address
- Types, describes the place e.g. restaurant, hotel.
The nearby places are set on the LocationInfo object. The object is placed in the queue search-images-queue.
Calling Microsoft Cognitive Services in Azure Functions
Microsoft brings Artificial Intelligence into your application by providing a set of services that are hosted in Azure. The variety of these services goes from face and speech recognition to advanced search capabilities. These services can be created in the Azure portal and like other resources in Azure, there is a pay as you go pricing model.
For this demo solution, I'm using two services, the Bing Image Service for getting some images for the nearby places and the Computer Vision Service for analyzing the found images. Let’s start with the Bing Image Service.
Search for images with the Bing Image Service
The previous Azure Function was responsible for searching places that are nearby the discovered beacon. In this function, I consult the Bing Image Service to get some images for every nearby place. The Bing Image Service is a restful API like the other services in the Cognitive Services toolset. There are some filters available that can be used in the search operation like a search query, size, color, freshness, and license of the image. In my case, I’m passing the address of the place as the search criteria and I don’t use any of the other filters. Of course, the service will just return images related to the address, it doesn’t have to be related to the nearby place. In order to filter out the bad images, I could use the Computer Vision Service to analyze the image for relevance. I will explain how this service works in the next section.
I'm downloading the returned images and upload them to a blob storage. The reference of the image is stored on the LocationInfo object. After that, I’m placing the object again in a new queue called image-vision-queue.
GET https://api.cognitive.microsoft.com/bing/v7.0/images/search?q=Weteringschans%20138%2C%201017%20XV%20Amsterdam%2C%20Netherlands HTTP/1.1
Host: api.cognitive.microsoft.com
Ocp-Apim-Subscription-Key: **APIKEY**
Analyze images with the Computer Vision Service
Humans understand the content of an image. We can identify a cat or dog in an image. For a long time, this was a bit harder for computers. Nowadays, this is becoming much easier with the rise of Artificial Intelligence. There are some great tools available to analyze images and one of those tools is the Computers Vision Service of Microsoft. This service is capable of identifying text, faces, celebrities, landscapes, and many more from an image. An image can be sent as binary data to the service and after analyzing it will return a JSON object which contains detail information about the content of the image. This all is done within a couple of seconds. Let me give a quick example. Below an image of a train station that I uploaded and the JSON data that was returned by the Computer Vision Service.

{
    "categories": [
      {
        "name": "outdoor_",
        "score": 0.00390625,
        "detail": {
          "landmarks": [

          ]
        }
      },
      {
        "name": "people_crowd",
        "score": 0.70703125
      }
    ],
    "description": {
      "tags": ["train", "building", "station", "platform", "track", "passenger", "outdoor", "people", "pulling", "waiting", "board", "group", "stopped", "walking", "subway", "stop", "white", "standing", "large", "parked", "man", "luggage", "riding"],
      "captions": [
        {
          "text": "a group of people waiting at a train station",
          "confidence": 0.9896244965429
        }
      ]
    },
    "color": {
      "dominantColorForeground": "Grey",
      "dominantColorBackground": "Black",
      "dominantColors": ["Grey", "Black", "White"],
      "accentColor": "6B403B",
      "isBwImg": false
    },
    "requestId": "d2d0d4ce-9545-4521-8413-26c101eedcfe",
    "metadata": {
      "height": 1140,
      "width": 2220,
      "format": "Jpeg"
    }
  }
You can see that the JSON data contains detailed information about the image. For example, it recognizes people, a train, it provides a summary of the image 'a group of people waiting at a train station' and returns some general information about the image. This is just a simple example there are many more options available.
Combining the Bing Image Service and the Computer Vision Service will give you more relevant results back for what your application needs. In my example solution, I just grab some images and let the computer vision service process them in order to get some meta information for each image. Like every other function, the LocationInfo is enriched with the found information and placed in the last queue completed-queue.
Store the collected data in Table Storage
All the functions I explained so far were pure to gather information about the location of the beacon that was found by the ‘Beacon Scanner’ app. The last function of the chain is responsible for storing the information so I can use it in my web application. There are several options in Azure to store information for example SQL database, Table Storage, Blob Storage, etc. All have their pros and cons which I’ll not cover in this blog post, there is enough documentation available that compare these different options. I’ve created a Table Storage and simple serialize the LocationInfo object and store it in a column. Now it's time to display the information that was collected by Azure Functions.
[FunctionName("CompletedFunction")]
[return: Table("Locations")]
public static LocationStorage Run([QueueTrigger("completed-queue", Connection = "AzureWebJobsStorage")]LocationInfo locationInfo, TraceWriter log)
{
var partitionKey = DateTime.Now.ToString("ddMMyyyy");
var item = new LocationStorage { PartitionKey = partitionKey, RowKey = locationInfo.Beacon.Identifier, Timestamp = locationInfo.Date, Name = locationInfo.Name, Data = Newtonsoft.Json.JsonConvert.SerializeObject(locationInfo) };
LogHelper.Log(log, $"CompletedFunction called: {item}");
return item;
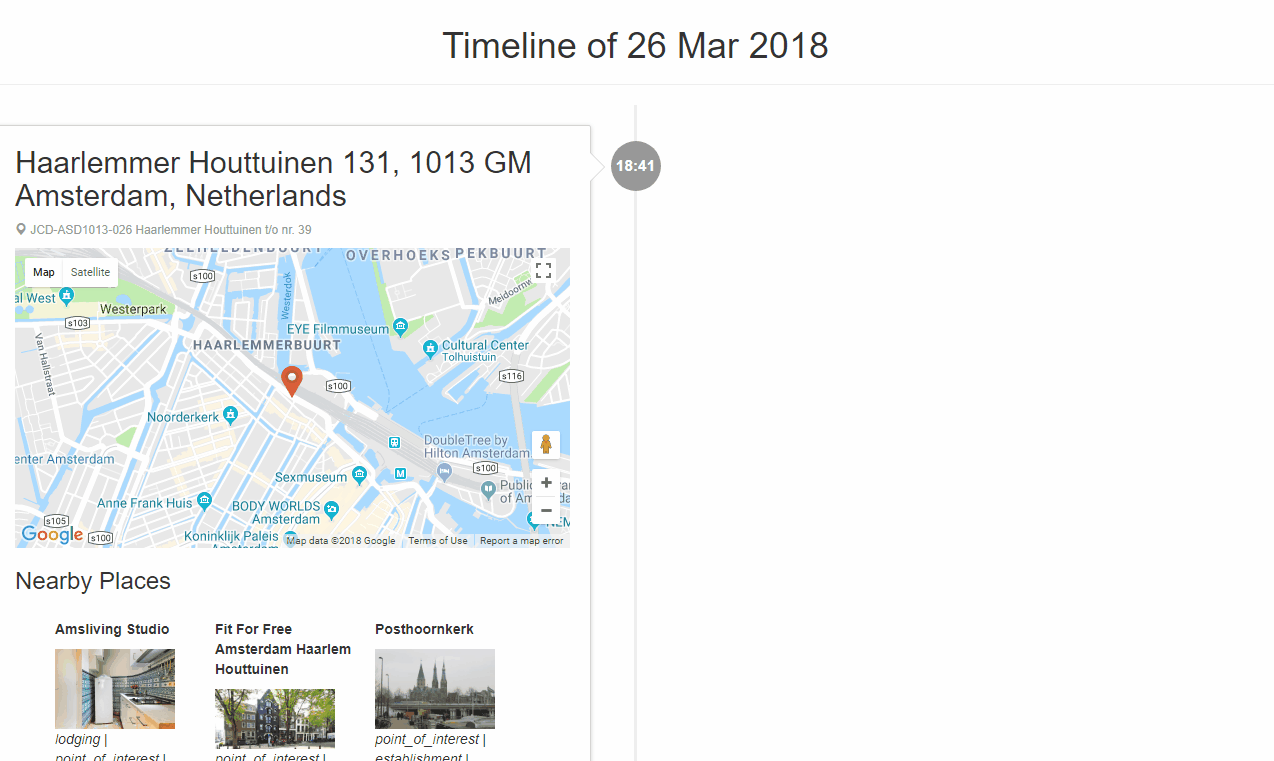
}Build a timeline application with ReactJS and Bootstrap
In order to display the collected information, I decided to use a simple timeline bootstrap template from this website. The web application exists of one simple page that displays the locations where I discovered beacons. I’m using ReactJS to render the data on the page. There was not a specific reason to use ReactJS or any other JavaScript framework. Fact is that there are some pros of using it and it’s currently extremely popular. The data is stored in Table Storage so I need to decide how to fetch that data. Normally it would make sense to create a simple Web API that will just get the information from Table Storage and return it. I decided to create an Azure Function that will be triggered by an HTTP request. So far I only used Azure Functions that are triggered when an object was placed on a queue or by a webhook. This function will be triggered by an HTTP request and returns data from the Table Storage. I’ve created some straightforward React components that display the data in a timeline. Below an animation of the timeline application.
Summarize
Amsterdam started a great initiative in 2016 by placing more than 300 beacons all over the city. It basically gave entrepreneurs the assignment to come with innovative and interesting ideas to use these beacons to eventually improve the accessibility and findability of interesting city highlighs. For my example solution, I biked through the city with the Beacon Scanner app installed and discovered multiple beacons. The app called a webhook each time a beacon was discovered and in my case, the webhook is an Azure Function. This function was the first one in the chain. In total, I connected six different functions by using queues. Each function is triggered when an item is placed in the queue. The idea of the different function is to gather information about the current location of the discovered beacon. I’m using Microsoft Cognitive Services for searching images and to understand the content of the found images. In the last Function, I store the information in Table Storage. The data is displayed in a timeline application build with a bootstrap design and ReactJS.
In this blog, I covered the use of beacons, how Azure Functions can be used and I explained a small part of the Microsoft Cognitive Services. I tried to come up with an idea and create an example solution that covers these topics. The timeline application is publicly available at this address https://sampletimelineapp.azurewebsites.net. The code is open source available in my GitHub repository.
Please leave a comment below, I would love to get feedback and hear about your ideas.
 Twitter
 LinkedIn
 GitHub