Xamarin - Near Field Communication
![]()
NFC stands for Near Field Communication. This technology was officially accepted in 2003 by the International Standards Organization. Like other technologies, NFC is based on standards. These standards are created and maintained by the NFC forum.
NFC connects and exchange data based on existing Radio Frequency Identification (RFID) standards. NFC operates at a short distance, approximately 10CM. This is mainly for the sake of security, this is actually one of the reasons why NFC is widely chosen as the technology for contactless payments.
There are three different NFC modes:
Card emulation
Physical cards are being replaced by NFC-enabled devices. For instance, instead of a card for opening your hotel room, you could use your smartphone for opening the door. Nowadays, card emulation is used for payments as well. We also call this, contactless payments.
Read and write
An enabled NFC device can exchange data by using tags and smart posters. A tag can hold a small amount of data that can be read by a device. An enabled NFC device can also write data on a tag. Basically, smart posters can hold multiple tags. Smart posters are widely used for marketing/advertisement purposes.
Peer to peer communication
Make sure that two enabled NFC devices can communicate with each other. Think of two smartphones that are exchanging data.
NFC connectivity
What I already mentioned is that NFC works on RFID standards. Let's have a closer look how an enabled NFC device (smartphone) can communicate with an NFC tag or smart post. There are basically two part that makes a communication over NFC:
Target
NFC tags or smart posters are the targets. Those holds the small amount of data that can be read/write by an enabled NFC device. A target can also be an enabled NFC device in a peer to peer communication mode.
Initiator
This is an enabled NFC device, like a smartphone. The initiator starts the NFC connection.
There are two modes when working with NFC passive and active. When in passive mode, the initiator sends RF energy to the target to power it. The target can now send data back to the initiator. During active mode, both the initiator and the target holds a power supply. That means both the initiator and target can send data to each other.
Of course, NFC is not the only technology for sending and retrieving data wireless. RFID, Bluetooth low energy, Wifi and QR codes are alternatives.
Does Apple support NFC?
Most modern devices that run on Android supports NFC. NFC is open for developers to use for the development of apps. With Apple, it's a totally different story. Since Apply released iPhone 6 in 2014, it includes an NFC chip. The only problem is that Apple didn't make it open for developers, that means that only Apply use NFC internally. Apply pay uses NFC to enable contactless payments. This is a big disappointment for a lot of developers and companies that want to use this technology. If Apply will eventually make NFC public for developers is still a big question mark.
Apple says opening up iPhone NFC would ‘fundamentally diminish’ security.
NFC real-life examples
- Banks provides an app that supports contactless payments by using NFC.
- Physical hotel room cards are being replaced by an app that makes it possible to (un)lock doors.
- Smart posters are being used for advertisement and marketing purposes.
- Hospitals provide built-in NFC wristbands to patients. The data on the NFC tag holds the patient number/identifier. Employees of the hospital can scan the wristband and have the patient medical file instantly available.
- NFC tags are being placed on books in a library. Visitors can view extra information by using the library app to scan the book.
- Use your imagination for more examples, NFC can be used for all kind of purposes.
Xamarin and NFC
For now, we can use NFC only for Android and Windows Phone development, of course only when the app is used on an enabled NFC device. In this topic, I'll explain how you can use NFC when working with Xamarin. With the release of Xamarin Forms, you can develop a cross platform app. Again iOS doesn't support NFC for developing apps. Specifically for iOS, you should look at an alternative technology. One that's being widely used is QR codes. I know this isn't perfect but smart posters can be ordered with NFC tags and QR codes.
The Android.Nfc namespace provides functionality to work with NFC. In the beginning of the blog, I explained that there are three different NFC modes read/write data to a tag, card emulation and peer to peer communication. In this section, I'll focus on working the first option, read and write data to an NFC tag.
There are different tag technologies available on the market. The NFC forum standardized five different tags, type 1, 2, 3, 4, 5. These tags are the most common ones and are being supported by most of the enabled NFC devices. There are also alternatives like MIFARE classic.
In this blog, I'll focus on the standardizes tags of the NFC forum. Let me start with explaining the NFC Data Exchange format (NDEF).
NFC Data Exchange format
The NDEF format is standardized by the NFC forum. This message format can be used to read or write from a tag or when working with two active enabled NFC devices. The message contains multiple records:
Header
The header record contains important information about the message. One of those is the Type Name Format (TNF). This field indicates the type of data in the payload (the actually transferred data). These are the possible values of the TNF field:
- 0 -> Empty
- 1 -> Well-known (text, uri, etc)
- 2 -> Multipurpose Internet Mail Extension (MIME)
- 3 -> Absolute Uniform Resource Identifier (URI)
- 4 -> External
- 5- > Unknown
- 6 -> Unchanged (when data in the payload field is too large, the data is chunked in multiple records)
- 7 -> Reserved (not used currently)
Other information stored in the header record are MB (message begin), ME (message end), CF, SR, and IL.
Type length
The length of the payload type.
Payload length
The length of the payload field, again in the payload field the actual data is stored.
ID length
Length of the ID field.
Record type
The type of the payload data. This value corresponds to the TNF field in the header.
Record ID
ID of the record, mostly used for external applications to identify the message.
Payload
Contains the actual data stored in bytes.
Android.Nfc
The namespace Android.Nfc contains all classes you need to work with NFC functionality. Let me highlight three classes:
NfcAdapter
This class represents the device's NFC adapter. This is the main starting point for developing with NFC. It contains all operations you need for discovering tags. This class also contains some constants which I'll explain later.
NdefMessage
This class represent the NFC Data Exchange format message what I explained in the previous chapter.
NdefRecord
As I explained in the previous section a message can have multiple records.
What I mention earlier is that there different tag types available. Xamarin supports a number of these type and can be found under the namespace Android.Nfc.Tech.
Ndef
Provides access to NDEF content and operations on a Tag.
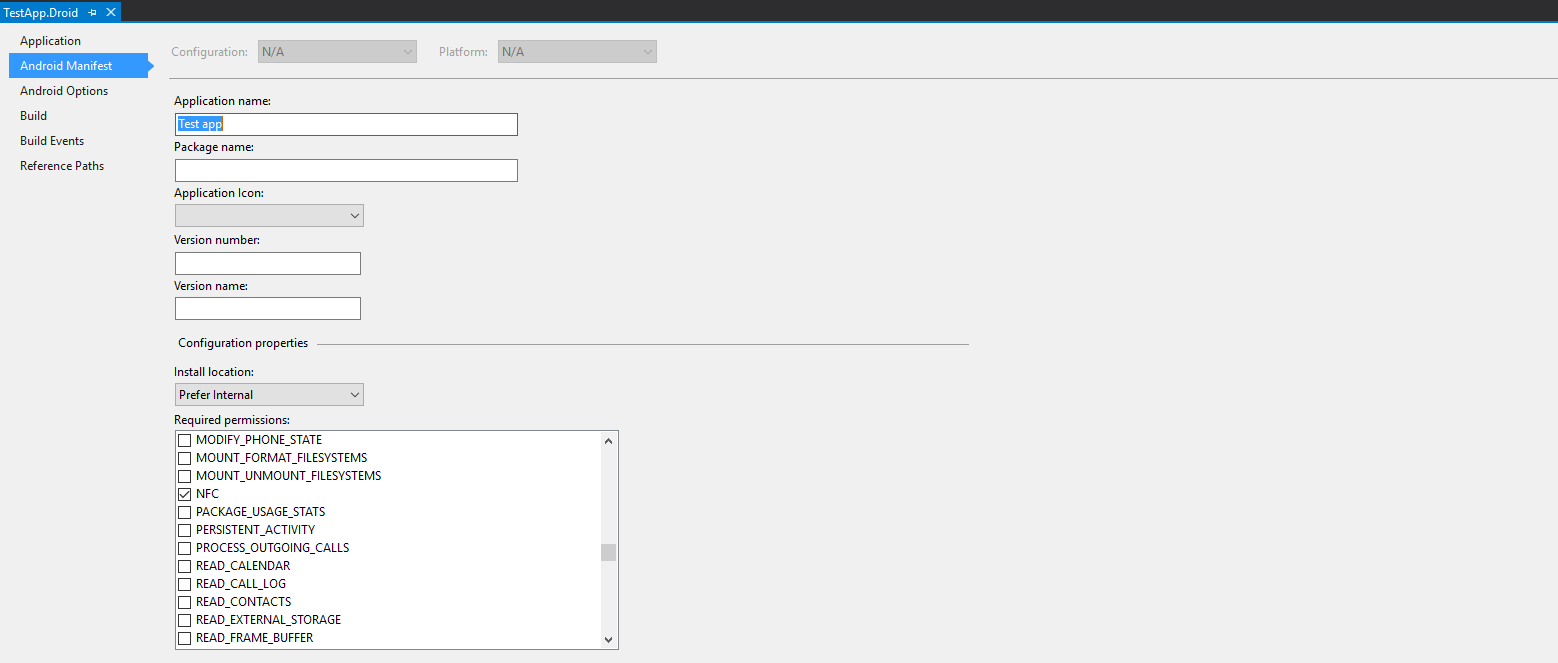
When you're building an App you need to explicit configure that your app wants to use the device's NFC adapter. You can do this by selecting the required permissions in the Android Manifest. Right click on the Android project in Visual Studio and select Properties, next select the tab Android Manifest.
The NfcAdapter class contains three action constants we can use for discovering tags. Meaning our app will do something when the smartphone scan a tag.
NfcAdapter.ActionNdefDiscovered
A tag with an NDEF payload is discovered.
NfcAdapter.ActionTagDiscovered
A tag is discovered.
NfcAdapter.ActionTechDiscovered
A tag is discovered and activities are registered for the specific technologies on the tag.
An activity contains lifecycle methods that can be overridden. The OnCreate method is basically the first method that is being called when an activity is created. The OnResume method is called when the activity is created and ready to start interacting with the user. In this method, we can hook up to events or display dialogs. In the code snippet, you can see that in the OnCreate method I'm getting an instance of the NfcAdapter by calling the GetDefaultAdapter and pass the current activity as a parameter. If we didn't set the NFC permission in the Android Manifest this method will return null. The NfcAdapter is the most important class when working with NFC, it contains operations for discovering a tag. In the OnResume method, I'm first checking if the NfcAdapter is not null. When it's null then I'm displaying a dialog message indicating NFC is not available for this app. Otherwise I'm creating a new IntentFilter with the ActionNdefDiscovered (android.nfc.action.NDEF_DISCOVERED) constant. By calling the EnableForegroundDispatch method and passing the intent, a new intent will be started when a tag containing a Ndef message will be started.
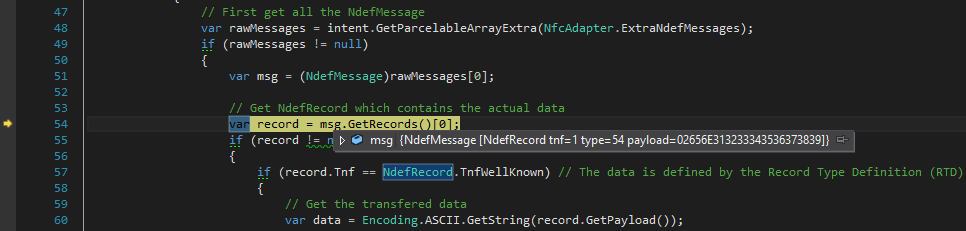
The OnNewIntent is called when a new tag is discovered. The data that's transferred in the intent can be retrieved by calling the GetParcelableArrayExtra method. This method, accepts a key parameter, for instance the ExtraNdefMessages (android.nfc.extra.NDEF_MESSAGES). The message on my NFC tags has only on message and that message holds one record with the actual data. When writing to a tag, will show this in the next section, you can define a TNF which is the type of the data. In my case, this is just a string value, so I'm using the WellKnown type name format. The GetPayload method will return the data in bytes, we can easily convert this to the string value.
[Activity(Label = "NfcActivity")]
        public class NfcActivity : Activity
        {
            private NfcAdapter _nfcAdapter;

            protected override void OnCreate(Bundle savedInstanceState)
            {
                base.OnCreate(savedInstanceState);

                _nfcAdapter = NfcAdapter.GetDefaultAdapter(this);
            }

            protected override void OnResume()
            {
                base.OnResume();

                if (_nfcAdapter == null)
                {
                    var alert = new AlertDialog.Builder(this).Create();
                    alert.SetMessage("NFC is not supported on this device.");
                    alert.SetTitle("NFC Unavailable");
                    alert.Show();
                }
                else
                {
                    var tagDetected = new IntentFilter(NfcAdapter.ActionNdefDiscovered);
                    var filters = new[] {tagDetected};

                    var intent = new Intent(this, this.GetType()).AddFlags(ActivityFlags.SingleTop);

                    var pendingIntent = PendingIntent.GetActivity(this, 0, intent, 0);

                    _nfcAdapter.EnableForegroundDispatch(this, pendingIntent, filters, null);
                }
            }

            protected override void OnNewIntent(Intent intent)
            {
                if (intent.Action == NfcAdapter.ActionTagDiscovered)
                {
                    var tag = intent.GetParcelableExtra(NfcAdapter.ExtraTag) as Tag;
                    if (tag != null)
                    {
                        // First get all the NdefMessage
                        var rawMessages = intent.GetParcelableArrayExtra(NfcAdapter.ExtraNdefMessages);
                        if (rawMessages != null)
                        {
                            var msg = (NdefMessage) rawMessages[0];

                            // Get NdefRecord which contains the actual data
                            var record = msg.GetRecords()[0];
                            if (record != null)
                            {
                                if (record.Tnf == NdefRecord.TnfWellKnown) // The data is defined by the Record Type Definition (RTD) specification available from http://members.nfc-forum.org/specs/spec_list/
                                {
                                    // Get the transfered data
                                    var data = Encoding.ASCII.GetString(record.GetPayload());
                                }
                            }
                        }
                    }
                }
            }
        }
The next step is writing to an NFC tag. Below a code snippet for writing to a discovered tag. This method can be called when a new intent (tag discovered) has been fired. I'm using the Ndef class to the actual writing of the data to the tag. The first step is to create the different parts payload, record, and the Ndef message which will be written on the tag. Don't forget to call the Connect method before writing to the tag, otherwise, an exception will be thrown.
public void WriteToTag(Intent intent, string content)
            {
                var tag = intent.GetParcelableExtra(NfcAdapter.ExtraTag) as Tag;
                if (tag != null)
                {
                    Ndef ndef = Ndef.Get(tag);
                    if (ndef != null && ndef.IsWritable)
                    {
                        var payload = Encoding.ASCII.GetBytes(content);
                        var mimeBytes = Encoding.ASCII.GetBytes("text/plain");
                        var record = new NdefRecord(NdefRecord.TnfWellKnown, mimeBytes, new byte[0], payload);
                        var ndefMessage = new NdefMessage(new[] { record });

                        ndef.Connect();
                        ndef.WriteNdefMessage(ndefMessage);
                        ndef.Close();
                    }
                }
            }
 Twitter
 LinkedIn
 GitHub